Configuration
You can configure the Collaborator Portal in different ways to best meet the needs of your business and users. The following sections provide guidance on how you can configure different aspects of the Collaborator Portal.
Enable passwordless login
External document collaborators must log into the Collaborator Portal to review documents and complete tasks. By default, every external document collaborator is required to set a password when their Collaborator Portal account is first created and to use that password with their email address to log into the Collaborator Portal. However, you can enable passwordless login so that external document collaborators have the option to access the Collaborator Portal with just their email address.
To enable passwordless login so that external document collaborators can log into the Collaborator Portal without setting or entering a password:
-
In Setup, navigate to the Collaborator Portal (
mvn__PP_Collaborator_Portal__mdt) custom metadata type. -
Edit the Default (
PP_Default) metadata record. -
Check the Enable Passwordless Login checkbox field.
-
Click Save.
Passwordless login for new users
Once passwordless login is enabled, new Collaborator Portal users can then follow the steps below to activate their account without having to set a password:
-
In the Collaborator Portal welcome email, click Login or the linked URL.
-
On the Set Password page, click Use Passwordless Login.
-
On the Welcome page, click click here.
-
If no default Salesforce login URL has been set, click Change Organization and select the Salesforce organization associated with the Collaborator Portal.
Passwordless login for existing users
After passwordless login is enabled, existing document collaborators who have already set passwords for the Collaborator Portal prior to the Scientific Publications Cloud Fall '24 release need to verify their email addresses to log in without passwords. To prompt existing users to verify their email addresses, you can initiate password resets. You must have the Multi-Factor Authentication for User Interface Logins general user permission to initiate password resets, and you can reset passwords individually or in bulk. For more information about the required permission, reference Salesforce's documentation on Enable MFA for External Experience Cloud Site Users (or Specific Internal Users).
You only need to have the Multi-Factor Authentication for User Interface Logins general user permission on your profile if you are resetting the passwords of existing Collaborator Portal users. You only need to reset every user's password once, and you can remove the MFA general user permission immediately after initiating the password reset.
To reset the password of an individual Collaborator Portal user so that they can verify their email address and use passwordless login:
Resetting a Collaborator Portal user's password with Option 1 will
not create Notification Log (mvn__SE_Notification_Log__c) records
due to standard Salesforce functionality. Notification logs will only be
created with Option 2.
-
In Setup, search for and select Users.
-
Click the name of the Collaborator Portal user.
-
Click Reset Password.
-
Option 1: Through the Users page in Setup
-
In Setup, search for and select Users.
-
Click the name of the Collaborator Portal user.
-
Click Reset Password.
-
-
Option 2: Through the Document Collaborators component on a Document record
-
Navigate to a Document record that the Collaborator Portal user has access to.
-
Click the Collaborators tab to view the Document Collaborators component.
-
Click the dropdown arrow at the right end of the row for the Collaborator Portal user.
-
Click Reset Password.
-
To reset the passwords of all Collaborator Portal users so that they can verify their email addresses and use passwordless login:
-
Ensure that the URL of the Collaborator Portal site is populated on the Default Collaborator Portal metadata record.
To find the URL of the Collaborator Portal site:
-
In Setup, search for and select All Sites.
-
On the Collaborator Portal row, note the value in the URL column.
To check the Collaborator Portal Name value on the Default Collaborator Portal metadata record:
-
In Setup, navigate to the Collaborator Portal (
mvn__PP_Collaborator_Portal__mdt) custom metadata type. -
Open the Default (
PP_Default) metadata record. -
Confirm that the Collaborator Portal Name (
mvn__PP_Collaborator_Portal_Name__c) field is populated with the URL of the Collaborator Portal site. If not, update the metadata record.
-
-
Run the following script:
List<TwoFactorMethodsInfo> twoFactorMethodsInfos = [Select Id, UserId, HasUserVerifiedEmailAddress FROM TwoFactorMethodsInfo]; Map<Id, TwoFactorMethodsInfo> userIdToTwoFactorMethodsInfo = new Map<Id, TwoFactorMethodsInfo>(); Set<Id> userIdsToSendAVerificationEmailTo = new Set<Id>();
            for(TwoFactorMethodsInfo tfmi : twoFactorMethodsInfos){
                userIdToTwoFactorMethodsInfo.put(tfmi.UserId, tfmi);
            }
List<User> portalUsers = [SELECT ID, Email FROM User WHERE UserType = 'PowerCustomerSuccess' AND isActive = true];
            for(User portalUser : portalUsers){
                if(userIdToTwoFactorMethodsInfo.containsKey(portalUser.Id) && !userIdToTwoFactorMethodsInfo.get(portalUser.Id).HasUserVerifiedEmailAddress){
                    userIdsToSendAVerificationEmailTo.add(portalUser.Id);
                }else if(!userIdToTwoFactorMethodsInfo.containsKey(portalUser.Id)){
                    userIdsToSendAVerificationEmailTo.add(portalUser.Id);
                }
            }
Database.executeBatch(new mvn.PP_PortalUserEmailVerificationsBatch(userIdsToSendAVerificationEmailTo), 200);
In the password reset email that is sent out, every Collaborator Portal user can click the linked URL to verify their email address and reset their password as desired. These users can then navigate to the Collaborator Portal and log in without a password, as described below.
Log in without a password
External document collaborators who wish to log into their Collaborator Portal accounts without a password can follow the steps below:
-
On the Welcome page, click click here.
-
If no default Salesforce login URL has been set, click Change Organization and select the Salesforce organization associated with the Collaborator Portal.
-
On the Login To Continue page, enter the email address for the account and click Send Verification Code. Salesforce will send a verification code.
-
In the "Verify your identity in Collaborator Portal" email, copy the verification code.
-
On the Enter Your Verification Code page, paste the verification code and click Verify Code.
-
Under the success message, click Continue.
Collaborator Portal users can click Log In With Password at any time during the login process to use their password instead of a verification code to log in. If an external document collaborator has never set a password, they can click Reset Password to initiate the password creation process.
Forgot password and Reset password
The Collaborator Portal supports password changes through two methods:
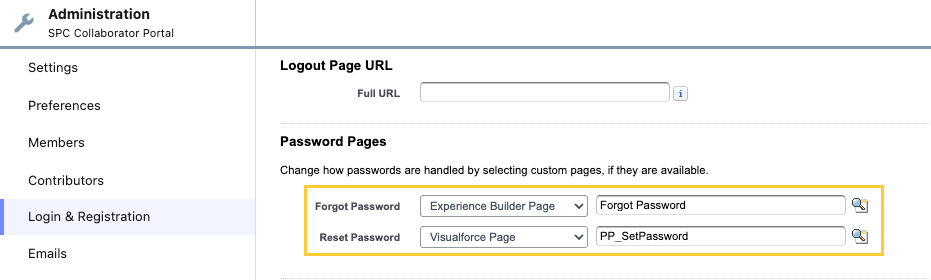
-
Forgot Password (before sign-in)
-
How users get here: They click Forgot Password on the live site before logging in.
-
What to set up: On the Experience Builder Forgot Password page, use the packaged ppPortalForgotPassword Lightning Web Component. This lets users request a password reset by email.
-
How it works: The server looks up the portal user the same way it does during login. If there’s no matching account, it still shows a generic success message so that email addresses aren't exposed.
-
-
Reset Password (from email link)
-
How users get here: They click the link in the welcome email or reset password email.
-
What to set up: The Reset Password page must use the PP_SetPassword Visualforce page. This page:
-
requires a verified email before a new password can be saved
-
shows your org’s password guidance when Salesforce provides policy text for the site
-
lets users type a matching password pair or accept a generated suggestion when offered by the interface
warningFor welcome email and reset password links, keep
PP_SetPasswordas the configured Visualforce page. Changing this step to a Lightning-only or custom-hosted page has caused sessions from the reset link to fail before submission. Stay onPP_SetPasswordunless Salesforce documents a supported alternative for your Experience setup.
-
-
Customize UI with static resources
You can use static resources to configure the help text, links, and logos in your instance of the Collaborator Portal. For more information about static resources, reference Salesforce's documentation on Static Resources.
If a static resource does not exist or the expected HTML is missing, a comment will appear in the HTML file directing you to the location of the static resource/html.
By default, the Collaborator
Portal (mvn__PP_Collaborator_Portal__mdt) custom
metadata type uses the PubsIdentity (PP_Pubs_Identity_Resource__c)
static resource. You can update the HTML content for the login page in
the file attached to the static resource by using the following file
paths and editing the file.
-
html/en-US/login/htmlTop.html -
html/en-US/login/htmlBottom.html
For example, you can include a line of text that appears on the bottom of the login page that will direct users to a custom link if they need help.
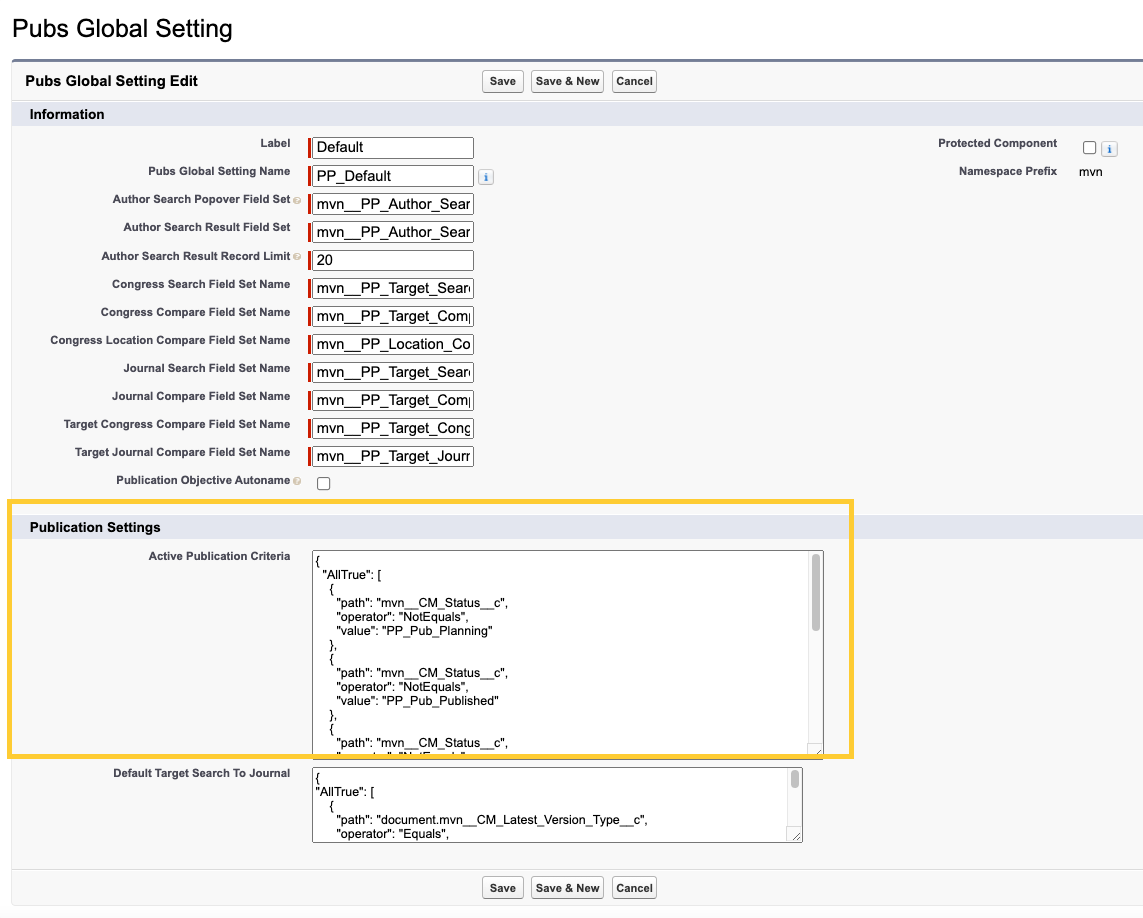
Configure the active publication criteria
Publications that appear on a document collaborator's instance of the Collaborator Portal are separated into "Active Publications" and "Inactive Publications". To define what is considered to be an "active" publication:
-
In Setup, navigate to the Pubs Global Setting (
mvn__PP_Global_Setting__mdt) custom metadata type. -
Edit the Default (
PP_Default) metadata record. -
Adjust the criteria under the Active Publication Criteria section.
-
Click Save.
Configure supporting document types
Supporting documents appear in the Related Documents subtab for each publication document in the Collaborator Portal. To configure which types of documents should be considered as supporting document types:
-
In Setup, navigate to the Supporting Document Type (
mvn__PP_Supporting_Document_Type__mdt) custom metadata type. -
Click Manage Supporting Document Types.
-
To edit an existing type, click Edit under the Action column. To add a new type, click New.
-
Ensure that all fields listed below are completed:
| Field label | Description |
|---|---|
| Label | Enter a label for the document type. |
| Role | Select a role from the options below. Users with this role will be able to see this document type. - Approver - Owner - Reviewer - Viewer - Publication Specialist - Author - Statistician |
| Document Type | Select a document type from the following options, including: - Supporting Document - Summary Data - Other :::: note ::: title ::: The document type should be appropriate for the selected role. For example, certain roles would not need to see "Other". :::: |
Configure task visibility
The "Task: Make Tasks Visible for Community Users" flow determines the visibility of tasks. To configure the logic inside the flow:
-
In Setup, search for and select Flows.
-
Click Task: Make Tasks Visible for Community Users. The Flow Builder interface appears.
-
Edit the flow logic as desired.
If the Public (IsVisibleInSelfService) field on the Task object is not
set to true, Collaborator Portal users will not see other users'
review/approval tasks.
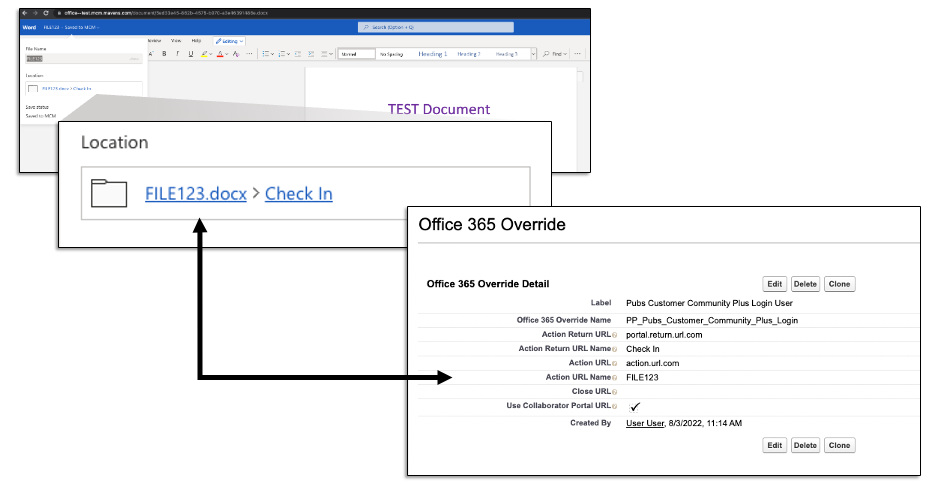
Override Microsoft 365 labels
If you use the Microsoft 365 integration in the Collaborator Portal, you can configure the names and actions of the links that appear in a document's file path. To do so:
-
In Setup, navigate to the Microsoft 365 Setting (
mvn__CA_Office_365_Setting__mdt) custom metadata type. -
Edit the Default (
Default) metadata record. -
Verify that the User Overrides Apex Class Name field is populated with
PP_Office365CheckoutUserOverrides. -
Navigate to the Office 365 Override (
mvn__PP_Office365_Override__mdt) custom metadata type. -
Add your preferred URL labels and names.
Checking the Use Collaborator Portal URL
(mvn__PP_Use_Collaborator_Portal_URL__c) field (i.e., setting the
checkbox to true) will make the following URLs default to the URL
of the Collaborator Portal:
-
Action Return URL
-
Action URL
-
Close URL
Values in the above fields will not break anything but will not be used in runtime.
The Close URL value does not appear in the user interface but should contain the URL you want to direct users to when the document is closed.
If a change is made to the configuration settings while a user(s) is working in a document, the changes will not appear until after the document is checked out again.
For instance, you can configure the Microsoft 365 integration settings so that external document collaborators can click on a specific hyperlink to navigate from a document in Microsoft 365 back to the Collaborator Portal. An example of a file path and its associated settings is shown below.