Veeva Network
Medical Information Cloud supports out-of-the-box integration with Veeva Network to facilitate Account search, both as a result of manual account searches and account lookups for inbound MIRFs. Additionally, supports the ability to create and deliver Data Change Requests (DCRs) to Veeva Network resulting from data changes within .
The steps required to connect and leverage a Veeva Network instance within are as follows:
-
Configure the Account Search Handler.
-
Register a Veeva Network instance.
-
Create a system in Veeva Network.
-
Configure the required field mappings.
-
Translate custom labels.
-
Configure data change request (DCR) creation.
Special considerations
Keep these considerations in mind when setting up the Veeva Network integration. Due to API and data model differences between and Veeva Network, these restrictions and limitations exist in the out-of-the-box Veeva Network integration:
-
Network Results are very heavy and can hit a fatal CPU Limit when processing results in some situations. It is recommended to set the Account Search Max Results to 75 or less to avoid this issue.
-
Restrict to Selected Institution and Restrict to Selected Person account search filters are not supported and the filter will not be applied when retrieving Network results.
-
If you use the beta mvn.MED_NetworkSearchHdlrV3 class, you can properly search and map network phones and emails to Contact Information records by mapping the special network fields of
phonesandemailstoMED_Contact_Information__c.MED_Phone__candMED_Contact_Information__c.MED_Email__crespectively. On the other hand, if you use the mvn.MED_NetworkSearchHdlr class, onlyMED_Addresstype Contact Information fields can be searched on and returned. Other types, likeMED_PhoneorMED_Emailcannot be mapped or searched. The Veeva Network data model does not have phone or email-related lists. Instead, it has many phone and email fields on both the Account and Address. This causes severe challenges when trying to search for phone and email addresses in the network and locally at the same time. Very careful planning and possibly custom data replication may be necessary to achieve an acceptable user experience for these types of searches with mvn.MED__NetworkSearchHdlr.
Step 1 - Configure Account Search Handler
For information on how to enable to search for accounts within registered Veeva Network instances, visit the configuration section of Account Search.
To enable the Account Search handler, edit the existing global setting custom metadata type entry and update the Account Search Handler Classes value to include the desired search handlers. Visit Master Data Management for instructions.
Configure searching and mapping of phones and emails
If you use the mvn.MED_NetworkSearchHdlrV3 class with the
mvn.MED_IAccountSearchV3 interface, you can search and map the special
network fields of phones and emails onto the MED_Phone__c and
MED_Email__c fields on Contact Information
(MED_Contact_Information__c) records. To configure this, create an
MDM Field
Mapping (MED_MDM_Field_Mapping__mdt) metadata
record for the phones and emails special values you wish to search
or map.
:::: ::: title :::
This is a beta feature. To fix any issues, clone the search handler and follow the customization guidelines. ::::
Step 2 - Register Veeva Network instances
Each Veeva Network instance that is to be integrated with must be registered within the configuration. Visit the Master Data Management topic for instructions.
Note: Default values are shown below. We recommend changing these according to your organization's needs.
-
Create MDM Connection (
MED_MDM_Connection__mdt) records:-
Navigate to the
MED_MDM_Connection__mdtcustom metadata type. -
Click Manage MDM Connections.
-
Click New.
-
Add the information shown in the table below.
-
MDM Connection Veeva Network Field Setup
| Field label | Default value | Required (Yes/No) |
|---|---|---|
| Label | Veeva Network | Yes |
| MDM Connection Name | Veeva_Network. | Yes |
| Segment | Search for and select Default_Segment | Yes |
| Default Mapping | Leave unchecked. :::: note ::: title ::: If the MED_Default_Mapping__c checkbox is checked, this connection will not be considered a real connection, but rather a template/default mapping for all other connections using the same handler class. These field mappings are added to the field mappings on the other connections. If there is a conflict, the real/non-default checked field mapping overrides it. :::: | |
| Handler Class | MED_NetworkSearchHdlr | Yes |
| MDM Named Credentials | Veeva_Network | |
| MDM Session Timeout | Although this is optional, we recommend it be set to slightly less than the session timeout configured for Veeva Network. If left blank, a value of 900 is used. | |
| MDM Call Timeout | 60,000 | |
| Network OpenData Search | Select "Defer to Network Instance Config" from the dropdown. | |
| Supplemental HCOs | Select None from the dropdown. | |
| Custom Key Generator Class | MED_NetworkCustomKeyGenerator |
- Configure named credentials.
These two components work in conjunction to enable access to Veeva Network from and must be configured correctly to ensure communication between the two applications.
Veeva Network search scope
Administrators can configure the scope of data to be searched within the Veeva Network by . By default, searches sent to Veeva Network by will defer to the configuration within the associated Veeva Network instance as to whether data collections such as Veeva OpenData are included within the search scope. If you want to control the search scope within , the available configurations are as follows:
-
Include OpenData Results
-
Exclude OpenData Results
-
Defer to Instance Configuration
This configuration is made within the corresponding entry in the
MED_MDM_Connection__mdt custom metadata type record on the
MED_Network_OpenData_Search__c field.
Named Credentials
In cases where remote Veeva Network instances are being leveraged, named credentials are required to facilitate the integration. For details on individual field values, please contact Customer Support.
Step 3 - Create a system in Veeva Network
This step is only required if you plan to use custom keys and/or DCRs and does not need to be completed for customers only wanting to search Veeva Network.
-
Create a
SYSTEMin Veeva Network using one of the following naming guidelines:-
The default
SYSTEMvalue isMIC. You can configure the value to something else by editing the Network System Name and Network System Description fields in the MDM Connection record. -
If you are only using a custom key generator and not DCRs, you may name the
SYSTEMsomething else.
-
Visit Veeva Network's documentation for more information.
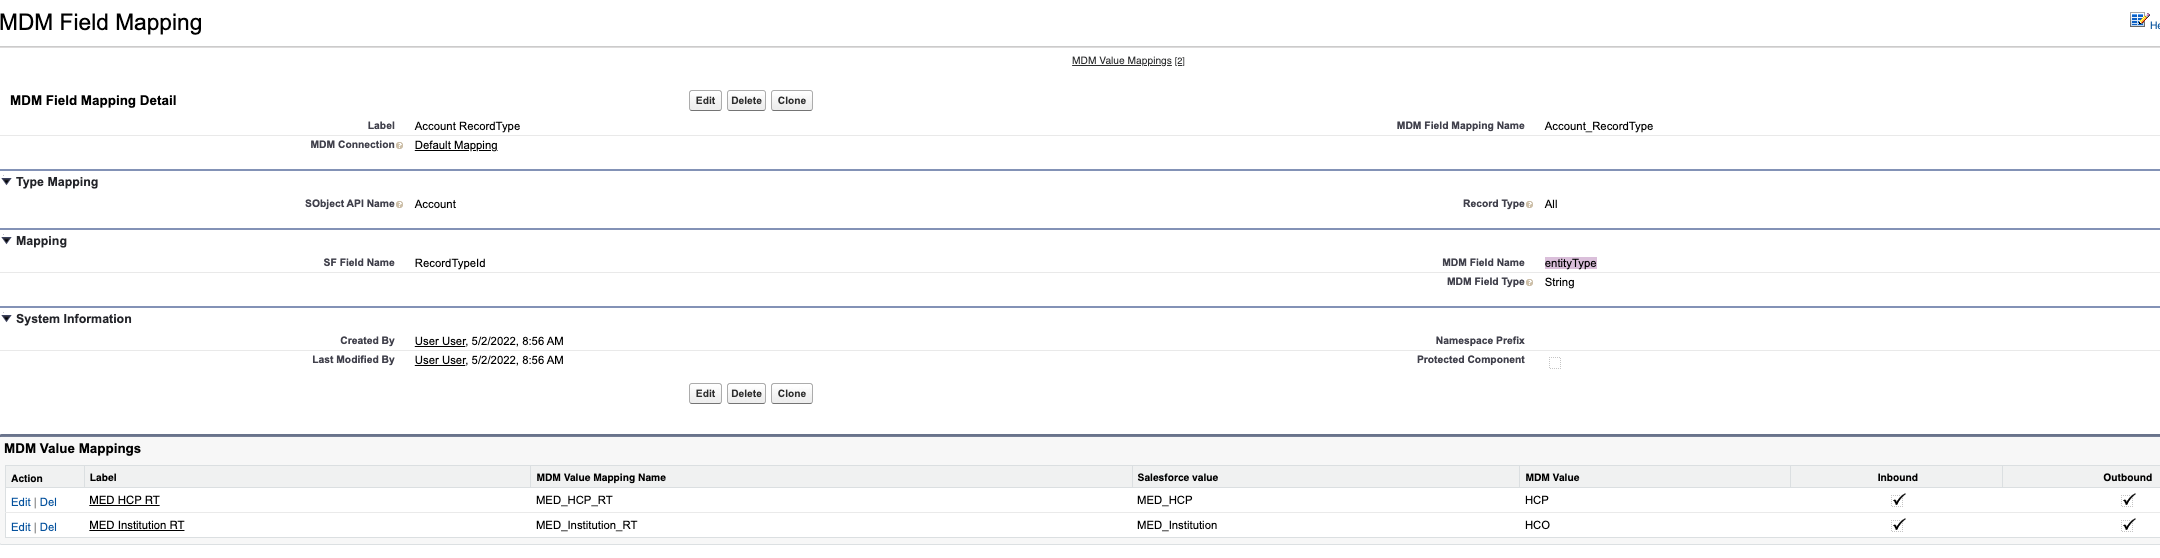
Step 4 - Required Field Mapping
Field mappings should be configured as instructed in Master Data Management.
Note: One of the fields must be mapped using the RecordTypeId field as shown below.
Step 5 - Translate custom labels
This component makes use of the following labels that can be configured within the Salesforce translation workbench to change display text values.
| Label Name | Description |
|---|---|
| MED_Access_Privileges_Network_Error | Used to return an error message when the user has not been granted access to the Network. |
| MED_Invalid_Session_Network_Error | Used to return an error message when the system is unable to log into the Network due to an Invalid Session. |
| MED_Other_Network_Error | Used to return an error message when the system got an error which is not covered. |
| MED_Network_Inactive_User_Error | Error displayed when the Network user is inactive. |
| MED_User_Locked_Out_Network_Error | Error displayed with the user has been locked out of the Network. |
Step 6 - Configure data change request (DCR) creation
You can integrate DCRs generated within with Veeva Network. To facilitate this, two apex batch jobs need to be scheduled to execute on an as-needed basis to facilitate the migration of DCRs and DCR transmission status between the environments.
Scheduling batch jobs
Each batch job is contained within its apex class and needs to be scheduled for execution. The classes are as follows:
-
MED_NetworkSendDCRBatchSched(Hourly is recommended) -
MED_NetworkRetrieveDCRBatchSched(Daily is recommended)
For help scheduling, visit Salesforce's Schedule Apex Jobs documentation.
On-demand batch job execution
The DCR batch jobs may be executed in an on-demand fashion, which can be helpful when testing system configuration.
To do this, use the Developer Console to execute the following anonymous Apex:
database.executebatch(new MED_NetworkSendDCRBatchSched(), 90); database.executebatch(new MED_NetworkRetrieveDCRBatchSched(), 90);
Veeva Network custom key generation
Each time an Account or Contact Information is copied from a Veeva Network instance, generates and associates a custom key to the corresponding record in Veeva Network to identify which records propagated to .
The default custom keys have this form:
MIC-\<SFDC Org Id\>:\<Object Type\>:\<Object Id\>. For example:
MIC-00D2C0000000uhfUAA:Account:001000000000001
Create a custom key structure
To define and use a custom key structure:
-
Create a custom Apex class that defines a custom key structure.
The custom key class should extend the Callable interface and return a
Map\<Id,Map\<String,Object\>\>with the ID key being the Salesforce record Id that the custom key is for. For information about the Callable interface, visit Salesforce's developer documentation.The class must pass two parameters through the call() interface method:
-
An action name to indicate the type of entity for which to generate custom keys. Values include:
-
GENERATE_KEYS_FOR_ACCOUNTS
-
GENERATE_KEYS_FOR_PARENT_ACCOUNTS
-
GENERATE_KEYS_FOR_CONTACT_INFO
-
-
An argument map containing the mdmConnectionId for a
MED_MDM_Connection__mdtrecord and the records for the list of objects that you want to get the custom keys for. The table below lists the fields that the passed records have.
-
Fields on records passed
| Veeva Network object | object | fields |
|---|---|---|
| Account | Account | - ID - IsPersonAccount - MED_External_Id__c - RecordType.DeveloperName - RecordTypeId |
| Parent Account (HCOs) | Account | - ID - IsPersonAccount - MED_External_Id__c - RecordType.DeveloperName - RecordTypeId |
| Address | Contact Information | - MED_External_ID__C - ID - RecordType.DeveloperName |
The required key structure for GENERATE_KEYS_FOR_ACCOUNTS and GENERATE_KEYS_FOR_CONTACT_INFO is:
    {
        ‘custom_key_source_type__v' =>string,
        'custom_key_value__v'=>string,
        'system_name'=>string,
        ‘vid_key’=>string,
        ‘custom_key_item_type__v’=>string
    }
For GENERATE_KEYS_FOR_PARENT_ACCOUNTS, vid_key is the only
required value. All other map values are ignored.
    {
        ‘vid_key’=>string
    }
:::: ::: title Account Key Structure :::
The default key implementation returns the following for an account:
    {
        ‘custom_key_source_type__v' : 'MIC-'<OrganizationID>,
        'custom_key_value__v': <Account Id>,
        'system_name': 'MIC',
        ‘vid_key’:'Network:Entity: <Account Id>,
        ‘custom_key_item_type__v’:'Account'
    }
::::
- Change the Custom Key Generator Class value on the corresponding MDM Connection custom metadata type record to the name of the custom Apex class created in the previous step.
Once configured, uses the custom key to build identifying information for Accounts and Contact Information on Update and Insert between Veeva Network and . maintains responsibility for transmitting the custom key.