Microsoft 365
The terms "Office 365" and "Microsoft 365" are used interchangeably throughout Medical Information Cloud and this documentation. Therefore, some documentation will still reflect the older "Office 365" label.
With the Microsoft 365 integration, you can check out documents and edit them in Microsoft 365. When you check out a document to Microsoft 365, a new browser tab opens and displays the document in Microsoft 365. While it is checked out, the document and all changes made to the document are stored in an Amazon Web Services environment that Mavens maintains. If you make changes to the document and close the Microsoft 365 tab before checking in the document, you can reopen the checked-out document with all of your changes. For the changes to be saved in Medical Information Cloud, check in the document from the document's detail page in Salesforce. If you cancel a checkout, all changes made to the document in Microsoft 365 are discarded.
The Medical Information Cloud product consumes the Microsoft 365 service as-is. Mavens makes no representations about the Microsoft 365 service and cannot guarantee the availability, reliability, privacy, or security of the Microsoft 365 service. Mavens has limited abilities to support and monitor the Microsoft 365 service. By using the Microsoft 365 integration, you agree to utilize the Microsoft 365 service as-is and agree to absolve Mavens of any and all liability that you or any person or entity associated with you may incur as a result of utilizing the Microsoft 365 service.
Requirements
Once Microsoft 365 is configured, users must be provisioned with licensing and permission set to use the Microsoft 365 integration, and only documents that meet requirements can be checked out to and checked in from Microsoft 365.
User requirements
To author content in Microsoft 365, users must have either the
CA_Office_365_Admin or the CA_Office_365_Author permission
set.
Document requirements
To check out a document in Microsoft 365 or to check in a document from Microsoft 365, the document must meet these requirements:
-
The file size of the document must be less than 5MB.
-
The document's file type must be supported. Supported file types include:
-
.docx
-
.pptx
-
.xlsx
-
-
The document must be either a
ContentVersionor amvn__CM_Document_Version__crecord.
Configuration
Mavens maintains two Microsoft 365 instances: Microsoft 365 production and Microsoft 365 test. Connect and use the Microsoft 365 production instance in a Medical Information Cloud production environment and the Microsoft 365 test instance in a Medical Information Cloud sandbox environment.
If you enable Salesforce's Summer '24 release in your org, make sure you configure Microsoft 365 as a trusted site to ensure that Microsoft 365 iframes load as expected. For more information, reference KI-121.
Microsoft 365 production instance
To connect to the Microsoft 365 production instance and enable users to use the Microsoft 365 integration:
-
Ask Mavens Customer Support to enable Microsoft 365 in your production instance. Include your org ID in the email.
-
Install the MCM Office - 365 connected app.
-
Navigate and log in to https://office.mcm.komodohealth.com/auth/login/start.
-
In the Quick Find box in Setup, search for and select Connected Apps OAuth Usage.
-
Click Install in the MCM Office - 365 connected app row.
-
-
Configure the OAuth access policy for the MCM Office 365 connected app.
-
In the Quick Find box in Setup, search for and select Manage Connected Apps.
-
Click MCM Office 365, and then click Edit Policies.
-
In the OAuth Policies section, select
Admin approved users are pre-authorizedfor the Permitted Users field.With this policy, as long as users have a permission set or profile that is assigned to the connected app, they can access the connected app without first authorizing the connected app. You will assign permission sets to the connected app in the next step.
-
Click Save.
-
-
Manage access to the MCM Office 365 connected app.
-
Click MCM Office 365.
-
Click Manage Permission Sets in the Permission Sets section.
-
Select
CA_Office_365_AdminandCA_Office_365_Author. -
Click Save.
-
-
Verify that
mvn__CA_Office_365_Setting__mdtis enabled and lists the correctSubdomainandEnvironment.-
In the Quick Find box in Setup, search for and select Custom Metadata Types.
-
Click Manage Records in the Microsoft 365 Setting row, and then click Default.
-
Verify that the Default record lists these values:
-
| Field | Value |
|---|---|
| Subdomain | office |
| Environment | Production |
| Enabled | ✓ |
-
If any of the values are wrong, update the values.
-
Verify that the
CA_Office_365_PRODremote site setting is active.-
In the Quick Find box in Setup, search for and select Remote Site Settings.
-
Verify that the
CA_Office_365_PRODremote site setting is active. -
Mark the remote site setting as active if it is not.
-
-
Assign users either the
CA_Office_365_Adminor theCA_Office_365_Authorpermission set. Visit Permission sets.
Microsoft 365 test instance
To connect to the Microsoft 365 test instance and enable users to use the Microsoft 365 integration:
-
Ask Mavens Customer Support to enable Microsoft 365 in your test instance. Include your org ID in the email.
-
Install the MCM Office - 365 - Test connected app.
-
Navigate and log in to https://office--test.mcm.komodohealth.com/auth/login/start.
-
In the Quick Find box in Setup, search for and select Connected Apps OAuth Usage.
-
Click Install in the MCM Office - 365 - Test connected app row.
-
-
Configure the OAuth access policy for the MCM Office 365 - Test connected app.
-
In the Quick Find box in Setup, search for and select Manage Connected Apps.
-
Click MCM Office 365 - Test, and then click Edit Policies.
-
In the OAuth Policies section, select
Admin approved users are pre-authorizedfor the Permitted Users field.With this policy, as long as users have a permission set or profile that is assigned to the connected app, they can access the connected app without first authorizing the connected app. You will assign permission sets to the connected app in the next step.
-
Click Save.
-
-
Manage access to the MCM Office 365 - Test connected app.
-
Click MCM Office 365 - Test.
-
Click Manage Permission Sets in the Permission Sets section.
-
Select
CA_Office_365_AdminandCA_Office_365_Author. -
Click Save.
-
-
Verify that
mvn__CA_Office_365_Setting__mdtis enabled and lists the correctSubdomainandEnvironment.-
In the Quick Find box in Setup, search for and select Custom Metadata Types.
-
Click Manage Records in the Microsoft 365 Setting row, and then click Default.
-
Verify that the Default record lists these values:
-
| Field | Value |
|---|---|
| Subdomain | office--test |
| Environment | Test |
| Enabled | ✓ |
-
If any of the values are wrong, update the values.
-
Register
https://office--test.mcm.komodohealth.comas an active remote site setting.-
In the Quick Find box in Setup, search for and select Remote Site Settings.
-
Create a new remote site setting. Enter these values:
-
| Field | Value |
|---|---|
| Remote Site Name | Office_365_Test_Komodo |
| Remote Site URL | https://office\--test.mcm.komodohealth.com |
| Active | ✓ |
- Create another new remote site setting. Enter these values:
| Field | Value |
|---|---|
| Remote Site Name | Office_365_Test_Mavens |
| Remote Site URL | https://office\--test.mcm.mavens.com |
| Active | ✓ |
- Assign users either the
CA_Office_365_Adminor theCA_Office_365_Authorpermission set. Visit Permission sets.
Troubleshooting
If the Microsoft 365 integration is not working, verify that:
-
Your user is assigned either the
CA_Office_365_Adminor theCA_Office_365_Authorpermission set. -
The Microsoft 365 instance that you are using is properly configured.
| Microsoft 365 production instance | Microsoft 365 test instance | |
|---|---|---|
| Connected app | Ensure the MCM Office 365 connected app is properly configured. | Ensure the MCM Office 365 - Test connected app is properly configured. |
| Remote site setting | Ensure the CA_Office_365_PROD remote site setting is active. | Ensure the CA_Office_365_TEST remote site setting is active. This is an internally facing remote site setting that is not exposed to customers. Ensure https://office--test.mcm.komodohealth.com and https://office--test.mcm.mavens.com are registered as active remote site settings. |
| Custom metadata | Ensure the mvn__CA_Office_365_Setting__mdt custom metadata is enabled and has these values: - Subdomain - office - Environment - Production | Ensure the mvn__CA_Office_365_Setting__mdt custom metadata is enabled and has these values: - Subdomain - office--test - Environment - Test |
- You are logged in as yourself. Microsoft 365 functionality does not work if you log in as another user via the Users tab in Setup.
Override Microsoft 365 interface labels
You can override the Microsoft 365 user interface labels based on the
type of user checking out the document to Microsoft 365. To support the
overrides, a Connected App Plugin assigns a userType to a user, and
the CA_IOffice365CheckoutUserOverrides interface provides overrides
for each userType. Visit Override interface labels.
Metadata
This section includes the primary user permissions, underlying data models, and system configurations for the Microsoft 365 integration.
Permission sets
To author content in Microsoft 365, you must be assigned either the
CA_Office_365_Admin or the CA_Office_365_Author permission set. If
you have one of these permission sets and are an owner or a collaborator
of a document, you can check that document out to Microsoft 365 and
reopen an already checked out document in Microsoft 365. Only the user
that checked out the document initially can check in the document.
| Permission set | Custom permission | Description |
|---|---|---|
| CA_Office_365_Admin | CM_Office_365_Admin | Users with this permission set can author Microsoft 365 content, check out any document to Microsoft 365, and reopen in Microsoft 365 any document that is already checked out. They are only able to check in or cancel the checkout of documents that they performed the checkout action upon. |
| CA_Office_365_Author | CM_Office_365_User | Users with this permission set can author Microsoft 365 content, check out documents of which they are a collaborator, and reopen in Microsoft 365 any document that is already checked out and that they are a collaborator of. They are only able to check in or cancel the check out of documents they performed the checkout action upon. For more information on collaborator permissions, refer to Salesforce's Change File Access in Lightning Experience documentation. |
Custom metadata
The Microsoft 365 Setting (mvn__CA_Office_365_Setting__mdt) custom
metadata contains settings related to the Microsoft 365 integration.
With this metadata, you can enable Microsoft 365 for an org and declare
the subdomain of the Microsoft 365 instance that you want to use. For a
list of Microsoft 365 Setting Fields, visit
Microsoft 365 Setting.
Remote site settings
Mavens' Microsoft 365 production site is registered as a remote site.
If you want to use the Microsoft 365 test instance, you need to
register https://office--test.mcm.komodohealth.com and
https://office--test.mcm.mavens.com as active remote site settings.
| Remote site name | Remote site URL | Active | Description |
|---|---|---|---|
| CA_Office_365_PROD | https://office.mcm.komodohealth.com | Yes | Whitelists the Microsoft 365 production site. |
| CA_Office_365_PROD_Mavens | https://office.mcm.mavens.com | Yes | Whitelists the Microsoft 365 production site. |
Objects
The Microsoft 365 functionality works with
both ContentVersion and mvn__CM_Document_Version__c files.
The ContentVersion sObject and mvn__CM_Document_Version__c custom
object contain the Microsoft 365 fields listed in the tables below.
Microsoft 365 ContentVersion fields
| Field label | API name | Data type | Description |
|---|---|---|---|
| Check Out Date/Time | mvn__CA_Check_Out_Date_Time__c | Date/Time | Date and time when the file was checked out. |
| Check Out Id | mvn__CA_Check_Out_Id__c | Text(36) (External ID) | Unique identifier for the checkout. |
| Check Out Type | mvn__CA_Check_Out_Type__c | Picklist | Type of check out the user requested. Picklist values include Office365 and Local. |
| Check Out URL | mvn__CA_Check_Out_URL__c | URL(255) | URL where the file is stored in Microsoft 365. |
| Check Out User | mvn__CA_Check_Out_User__c | Lookup(User) | User who checked out the file. |
| Checked Out | mvn__CA_Checked_Out__c | Formula (Checkbox) | Whether the file is currently checked out. |
Microsoft 365 mvn__CM_Document_Version__c fields
| Field label | API name | Data type | Description |
|---|---|---|---|
| Check Out Date/Time | mvn__CM_Check_Out_Date_Time__c | Date/Time | Date and time when the file was checked out. |
| Check Out Id | mvn__CM_Check_Out_Id__c | Text(36) (External ID) | Unique identifier for the checkout. |
| Check Out Type | mvn__CM_Check_Out_Type__c | Picklist | Type of check out the user requested. Picklist values include Office365 and Local. |
| Check Out URL | mvn__CM_Check_Out_URL__c | URL(255) | URL where the file is stored in Microsoft 365. |
| Check Out User | mvn__CM_Check_Out_User__c | Lookup(User) | User who checked out the file. |
| Checked Out | mvn__CM_Checked_Out__c | Formula (Checkbox) | Whether the file is currently checked out. |
For more information on the mvn__CM_Document_Version__c custom object,
visit Document Version.
Override Microsoft 365 user interface labels
You can override the Microsoft 365 user interface labels based on the
type of user checking out the document to Microsoft 365. To support the
overrides, a Connected App Plugin assigns a userType to a user, and
the CA_IOffice365CheckoutUserOverrides interface provides overrides
for each userType.
Considerations
Keep these considerations in mind when implementing user overrides:
-
As Salesforce users can change user types while logged in to Microsoft 365, Microsoft 365 user data may be stale. To prevent this, revoke users' Microsoft 365 Connected App session. This forces users to log in to Microsoft 365, which refreshes the data.
-
All URLs are displayed in anchor tags. Application engineers should follow best practices to ensure GETs are safe.
Implement overrides
To override the Microsoft 365 user interface labels:
-
Create a
ConnectedAppPluginclass that addsmvn__userTypeto the user's attributes. This ensures that the Salesforce identity provider (IDP) passes themvn__CA_O365_UserTypein the user'scustom_attributes.:::: ::: title userType is set to the user's profile's name :::
    public with sharing class Office365ConnectedAppPlugin extends Auth.ConnectedAppPlugin {
        public override Map<String, String> customAttributes(
            Id userId,
            Id connectedAppId,
            Map<String, String> formulaDefinedAttributes,
            Auth.InvocationContext context
        ) {
            User user = [SELECT Profile.Name FROM User WHERE Id = :userId];
formulaDefinedAttributes.put('mvn__CA_O365_UserType', user.Profile.Name);
return formulaDefinedAttributes; } } ::::
-
Implement
CA_IOffice365CheckoutUserOverrides.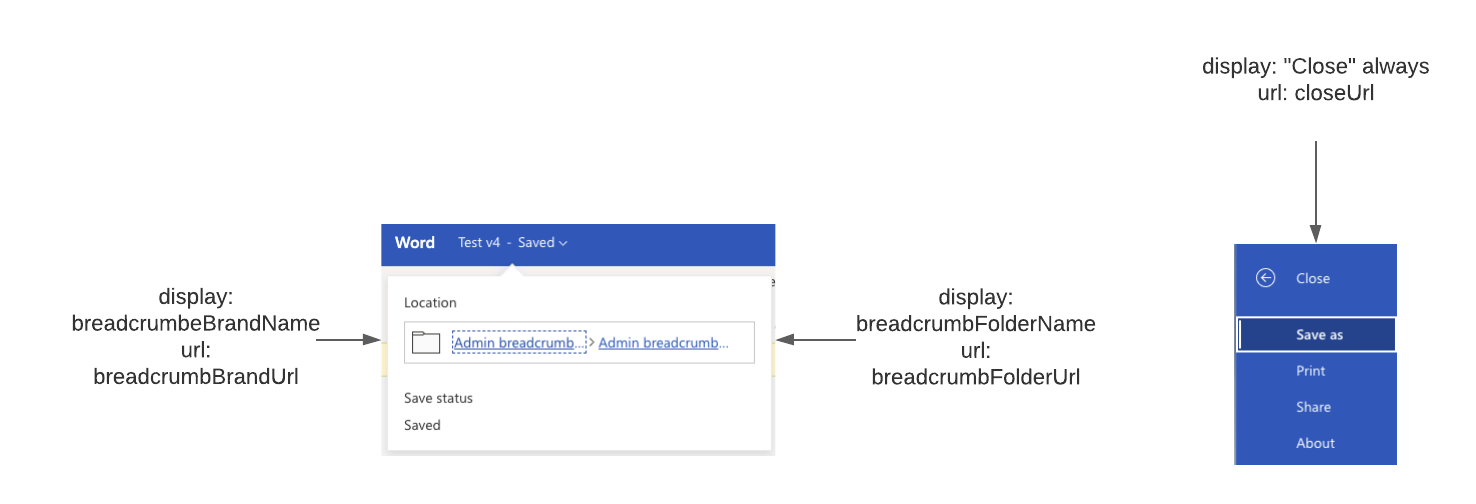
:::: ::: title Implement interface :::
    global with sharing class CM_Office365CheckoutUserOverrides implements CA_IOffice365CheckoutUserOverrides {
        global Map<String, Map<String, String>> getOverridesByUserType(Id documentVersionId) {
            return new Map<String, Map<String, String>>{
                'System Administrator' => new Map<string, String>{
                    'breadcrumbBrandName' => 'Admin action url',
                    'breadcrumbBrandUrl' => 'Admin action name',
                    'breadcrumbFolderName' => 'Admin return url',
                    'breadcrumbFolderUrl' => 'Admin return name',
                    'closeUrl' => 'Admin close url'
                }
            };
        }
    }
-
Add the user override Apex class name and namespace to the Microsoft 365 Setting (
CA_Office_365_Setting__mdt) custom metadata.-
In the Quick Find box in Setup, search for and select Custom Metadata Types.
-
Click Manage Records in the Microsoft 365 Setting row, and then click Default.
-
Click Edit, and enter values for these fields:
-
User Overrides Apex Class Name - the name of the Apex class that implements the
CA_IOffice365CheckoutUserOverridesinterface. -
User Overrides Apex Class Namespace - namespace of the Apex class defined in the User Overrides Apex Class Name field.
-
-
Click Save.
-
-
Add the
Auth.ConnectedAppPluginclass to the Microsoft 365 connected app as a plugin.-
In the Quick Find box in Setup, search for and select Manage Connected Apps.
-
Click MCM Office 365 or MCM Office 365 - Test.
-
Click Edit Policies.
-
Enter
Auth.ConnectedAppPluginin the Apex Plugin Class field. This field is located in the Custom Connected App Handler section. -
Click Save.
-