Fulfillment
A record that stores the written response you send via email, fax, or mail to an Account. With a Fulfillment record, you can create a package of information to send via email, mail, or fax to the account that submitted the inquiry. The Fulfillment Package includes a cover letter and all the documents used to answer the account's questions.
When you give an Account a verbal response, you do not create a Fulfillment. Fulfillments are only used for written responses.
A Fulfillment record can be configured using the
Fulfillment (MED_Fulfillment__c) custom
object.
Fulfillment package generation
A fulfillment is a document or a collection of documents that is sent to
a requester via channels like email, mail, chat, fax, and in-person
delivery to address some question or concern and resolve the medical
information request captured in the Medical Information Cloud system. To generate and send
fulfillment packages, Medical Information Cloud first uses Nintex's DocGen service to assemble
all of the selected or configured content elements as a Dynamic Document
Package (DDP) onto a Fulfillment (MED_Fulfillment__c) record and then
lets users choose how to deliver the package to fulfill the request. For
email deliveries, the system has two methods: an Email Fulfillment
option and a Digital Fulfillment option. The former takes users directly
to the email message with the fulfillment package attached, where the
email message uses predefined Classic Email Templates as configured on
the DocGen Package's Email Delivery Option. The latter, on the other
hand, allows users to construct a dynamic email template from content
elements that exist within the Regulated Content Cloud module. For more information on how to
generate and send fulfillment packages, reference the Generate packages
and Enable the package generation functionality sections below.
To generate and send fulfillment packages, users must be assigned the
DocGen User (DDP_User_All) permission set, which is included in the
Medical Information Cloud User (MED_Medical_Information_Cloud_User) permission set group. To
customize the cover letter component and email body message, users must
also be assigned the Customize Response on Fulfillment
(MED_Customize_Response_on_Fulfillment) custom permission.
Generate packages
The fulfillment package generation process involves creating a cover
letter, which merges all of the related cover letter component documents
with the relevant request and case documents, generating the merged
fulfillment package document, and then attaching the fulfillment package
as a file on a Fulfillment record, along with any request documents
whose delivery option equals Attach Separate, PDF or
Attach Separate, Original Format. The package generation functionality
must be enabled according to the Enable the package generation functionality section while the
components to be included inside the cover letter and the documents to
be merged into the package can be configured according to the
Configure cover letter component behavior and Configure which cover letter components to merge sections.
After the package generation functionality is properly enabled and configured, users can initiate the fulfillment package generation process by clicking the Generate Package button on a Fulfillment record page. This will open the Configure Fulfillment Package modal for users to modify and confirm both the contents to be included in the different sections of the cover letter as well as any documents to be merged based on their individual delivery options. If there are multiple pieces of information within a section in the cover letter, users can drag and drop the information to reorder how they appear in the cover letter.
The Configure Fulfillment Package modal also lets users choose between two delivery methods. If a user selects Finalize, the package generation job will create a single, compliant PDF file that is automatically attached to the Fulfillment record. On the other hand, if a user selects Customize, the package generation job will instead create a DOCX file for the user to further refine before finalizing as a PDF file.
To actually run the package generation job, users must click Run in the Configure Fulfillment Package modal. Afterwards, users can track the progress of the job with the Running Jobs utility bar at the bottom of the page, which can be minimized or kept open throughout the process.
When the fulfillment package finishes generating or if the package generation process runs into an error, users are notified in the Running Jobs utility bar and via the bell notification at the top of the page. If the fulfillment package is generated successfully, a link to the Fulfillment record will be available and users can subsequently choose how to deliver the fulfillment package to the requester. For email deliveries, there are two ways to send the fulfillment package, as described in the Send fulfillment packages via email section below. If the fulfillment package does not generate successfully, however, please reference the Troubleshoot Nintex errors section below. Once the Fulfillment record is closed or canceled, the package job will no longer appear in the Running Jobs utility bar.
Configure Fulfillment Package modal options ::: {wrapper="1" role="img-thumbnail"} 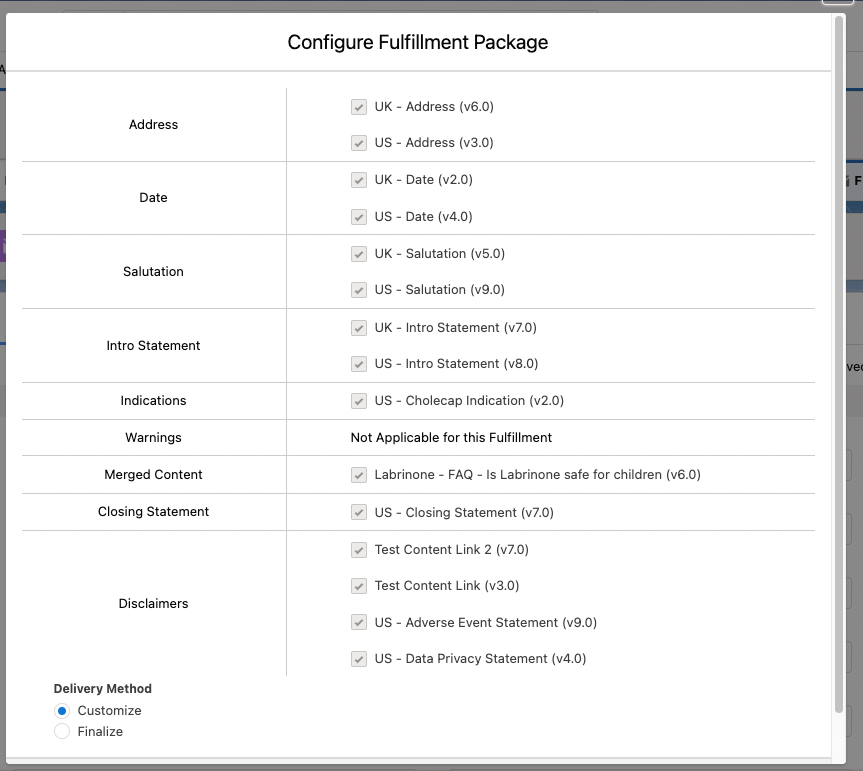 ::: ::: | Running Jobs utility bar ::: {wrapper="1" role="img-thumbnail"} 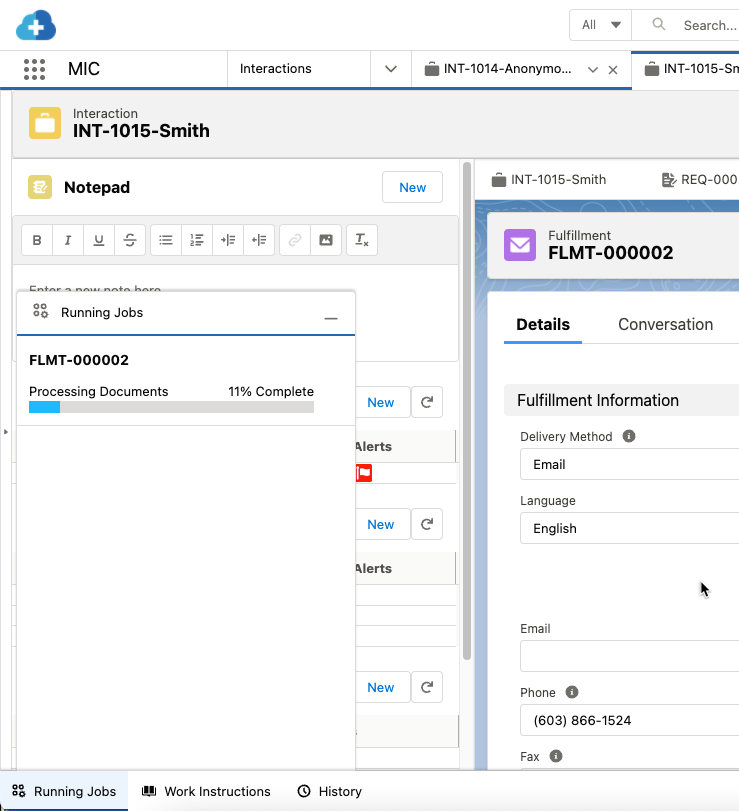 ::: ::: |
|---|
Enable the package generation functionality
To enable the fulfillment package generation functionality:
-
Add the Generate Package (
MED_Generate_Fulfillment_Package) button to the appropriate Fulfillment page layout. For information on how to add buttons to page layouts, visit Salesforce's documentation on how to Define Custom Buttons and Links. -
Add the MIC - Nintex Queue (
MED_NintexQueue) utility bar component to the Medical Information Cloud app and set the component to run automatically. For more information about the utility bar in Medical Information Cloud, visit Utility bar.
The fulfillment package generation process will not run unless the component is visible in the active app.
-
In Setup, search for and select App Manager.
-
To the right of the MIC (
Medical_Information_Cloud) app, click the dropdown arrow and then Edit. -
Click Utility Items (Desktop Only).
-
Ensure that the MIC - Nintex Queue (
MED_NintexQueue) component is in the utility bar. If it is not, click Add Utility Items and then MIC - Nintex Queue.- (Optional) Rename the label of the component from "MIC - Nintex Queue" to "Running Jobs".
-
Ensure that the MIC - Nintex Queue component is set to start automatically. If it is not, check Start automatically.
-
Click Save.
Load default DDPs
Dynamic DocGen Packages (DDPs) are used to generate fulfillment packages
as well as to create snapshots of Medical Information Cloud records, enabling the Generate
Package, Generate Snapshot, and Send To Safety buttons on
Fulfillment (MED_Fulfillment__c), Request (MED_Request__c), and
Adverse Event (MED_Adverse_Event__c) record pages, respectively. You
can choose to either use Medical Information Cloud's default DDPs, modify them, or create your
own. The Package Job
(mvn__MED_Package_Job__c) object facilitates the processing of DDPs.
To load the default Inquiry Management DDPs into your Salesforce environments with the Install Service, install the Medical Information Cloud - Setup configuration and run the optional "Load default DDPs and enable files" step.
The standard Generate Package, Generate Snapshot, and Send to
Safety buttons in Medical Information Cloud are object links with URL parameters that contain
specific DDP tags. For instance, the filter parameter is the specific
tag that the Medical Information Cloud system needs in order to know which DDP to use.
If you are modifying or creating your own DDPs, you can include record
data using merge field notation. This will enable you to configure
dynamic delivery options under different criteria. For example, if you
set the filter parameter in the URL so that it equals
REQSnapshotDDP_ plus the 2-digit ISO country code, then the filter for
requests in the United States would look like REQSnapshotDDP_US.
However, keep in mind that if you update the parameters in the URL to
use a dynamic value and there is no DDP with a matching filter value,
then the system will fail to generate the DDP.
For more information about object links and merge fields, reference Salesforce's documentation on how to Provide Actions, Buttons, and Links and Merge Fields, respectively.
Configure cover letter component behavior
To identify which content elements can be included in the cover letter
of a fulfillment package, such that they can be selected and organized
in the Configure Fulfillment Package modal, use the
Dynamic Fulfillment Setting
(MED_Dynamic_Fulfillment_Setting__mdt) custom metadata type. Each
Dynamic Fulfillment Setting metadata record represents a collection of
settings that define how the cover letter components should be merged
into the cover letter. First, the Subtype (MED_Document_Subtype__c)
field determines which Document
(mvn__CM_Document__c) record(s) the information should be retrieved
from. Then, the other Dynamic Fulfillment Setting metadata fields
specify which cover letter components are optional or required, what
default values should be set for certain components, what order or what
section each piece of information should appear in the cover letter and
modal, how the selected components should be combined, and more.
Configure which cover letter components to merge
To configure the optional, conditional criteria that determine which
cover letter components should be merged into a fulfillment package, use
the Dynamic Fulfillment Filter
(MED_Dynamic_Fulfillment_Filter__mdt) custom metadata type. Each
Dynamic Fulfillment Filter metadata record represents some criteria for
filtering cover letter components by matching the configured Fulfillment
Field (MED_Fulfillment_Field__c) value to the corresponding Document
Field (MED_Document_Field__c) value. For example, if a typical
fulfillment package needs a specific indication statement to apply for a
healthcare professional versus a consumer, you may wish to create a
Dynamic Fulfillment Filter metadata record related to a Dynamic
Fulfillment Setting metadata record for indication cover letter
components. On the Dynamic Fulfillment Filter metadata record, the
Fulfillment Field value on the former can be set to equal a custom
formula field called Account_Type__c that retrieves the Account record
type (MED_Account__r.MED_Record_Type_Name__c) value while the Document
Field value would relate to the MED Allowed Audience
(MED_Allowed_Audience__c) CMS Field Mapping
(MED_Document_Field_Mapping__mdt) metadata record. After the filtered
components are retrieved, they are displayed in the Generate Fulfillment
Package modal and are available to be merged into the fulfillment
package in place of all of the cover letter components of that subtype.
Configure documents to merge
To configure how a document in the Regulated Content Cloud module behaves during the fulfillment
package generation process, modify the document's metadata.
Specifically, the Delivery Option (mvn__CM_Delivery_Option__c) field
on the Document Version
(mvn__CM_Document_Version__c) object, which is a required field when
creating new content in the Regulated Content Cloud module, directs how the document should be
handled when it is associated with an
Interaction (Case) and
Request (MED_Request__c) record.
For example, a document containing a standard response to a question may
have a Delivery Option value of Merge Into Package, which indicates
that the document will be inserted into the fulfillment package when the
fulfillment package generation process completes. Meanwhile, a document
containing a journal article may have a Delivery Option value of
Attach Separate, Original Format, which indicates that the document
will be added as an unmodified article to the Fulfillment record as a
file during the fulfillment package generation process and will be
included as an attachment when a requester is emailed the fulfillment
response.
The table below lists all of the possible document behaviors.
Document delivery options
| Delivery option | Description |
|---|---|
| Attach Separate, Original Format | The document will be included in the fulfillment package as a separate file or attachment in the format that it was originally uploaded in. |
| Attach Separate, PDF | The document will be included in the fulfillment package as a separate PDF file. |
| Merge into Package | The document will be combined with other documents related to the Interaction record that also have the Merge into Package delivery option, and all of the documents will be included in the fulfillment package as a single PDF file. |
| Send as Link | The document will be delivered to the requester as a link. |
| HTML Only | The document will be included in an email body message. This should only be used if the fulfillment package is to be sent via the email method, and only the information on the Content (rich text) (mvn__CM_Content_Rich_Text__c) field on the Document Version record will be used. |
Troubleshoot Nintex errors
If you experience an error during the fulfillment package generation process, Mavens recommends performing the following troubleshooting steps:
-
Make sure the documents actually have files and placeholders.
-
Review the Special considerations section below and check every document in the package for compliance.
If you still experience any issues, please open a Nintex case with the error ID.
Special considerations
Please keep the following special considerations in mind when creating and preparing any documents to be included in fulfillment packages and when running the fulfillment package generation process:
-
Users must be assigned the Medical Information Cloud User (
MED_Medical_Information_Cloud_User) permission set group, which includes the DocGen User (DDP_User_All) permission set. -
The file types that can be converted to PDFs for generating fulfillment packages include:
-
Microsoft Word (.doc, .docx)
-
Microsoft Excel (.xla, .xlsx, .xlsm)
-
Microsoft PowerPoint (.ppt, .pptx)
-
PDF
-
Plain Text (.txt)
-
CSV (comma-separated values)
-
Any non-Microsoft documents will be attached separately, producing multiple files instead of one consolidated PDF.
Do not mix .doc and .docx files within the same package.
-
Only native Word fonts are supported. If a generated PDF has font issues, embed the fonts in the Microsoft document(s) and regenerate the package.
-
The following DDP features are supported:
-
Insert-update
-
Data sources
-
Merge fields
-
-
The following DDP features are not supported:
-
Pause to edit
-
DocGen package forms
-
Documents (list on DDP is dynamically created and any in the DDP template are ignored)
-
-
Do not password protect files.
-
Do not upload a file and use the Context (rich text) (
mvn__CM_Content_Rich_Text__c) field on a document. This is because the Generate Package button for generating the fulfillment packages merges documents without rich text while the Digital Fulfillment button for creating the email body message for the Digital Fulfillment feature only merges documents with rich text. -
If you are using the Digital Fulfillment feature, merge fields that reference a nonexistent field and/or return a
nullor empty value will simply appear blank in the email and will not throw an error. However, merge fields that include HTML code (e.g.,\<span\>elements) will throw an error. -
If you are using Email-to-Case, make sure you include at least one cover letter component that references the Case Thread Token (
MED_Case_Thread_Token__c) field on the Fulfillment record.
Send fulfillment packages via email
After a fulfillment package is generated, users can send the fulfillment
package to the requester via channels like email, mail, chat, fax, and
in-person delivery. For email deliveries, users can use either the
Email Fulfillment (MED_Email_Fulfillment) button or the Digital
Fulfillment (MED_Generate_Fulfillment_Letter) button on the
Fulfillment record page. The two buttons use different email components
and processes to send the fulfillment package, and Mavens recommends using the
latter for emailing as it is a newer feature in Medical Information Cloud that is more flexible
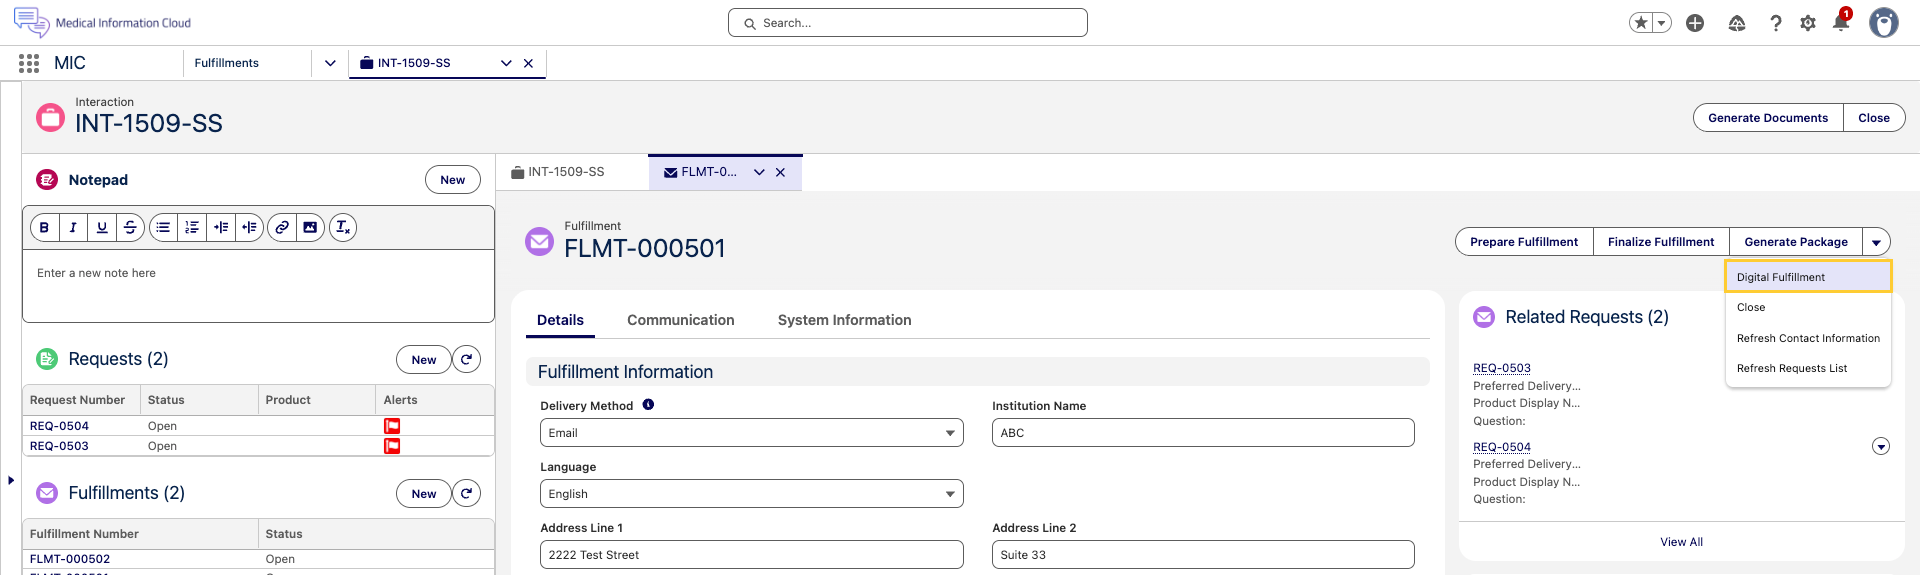
for digital deliveries. You will need to add the Digital Fulfillment
quick action to the appropriate page layout to enable it for users.
Email Fulfillment
If a user clicks the Email Fulfillment button on the Fulfillment record page, an email component will open in a new subtab and attach the fulfillment package to the email. The email body can be configured with an email template. For more information, reference Salesforce's documentation on Email Templates in Lightning Experience.
Digital Fulfillment
Digital Fulfillment is the Medical Information Cloud workflow for delivering a Fulfillment as an email with merged or attached PDF content. It uses the Lightning email composer (the Enhanced Email Composer) for the email body and a two-step Prepare/Finalize flow for the merged document package.
Run a Digital Fulfillment
Follow the steps below to run a Digital Fulfillment:
-
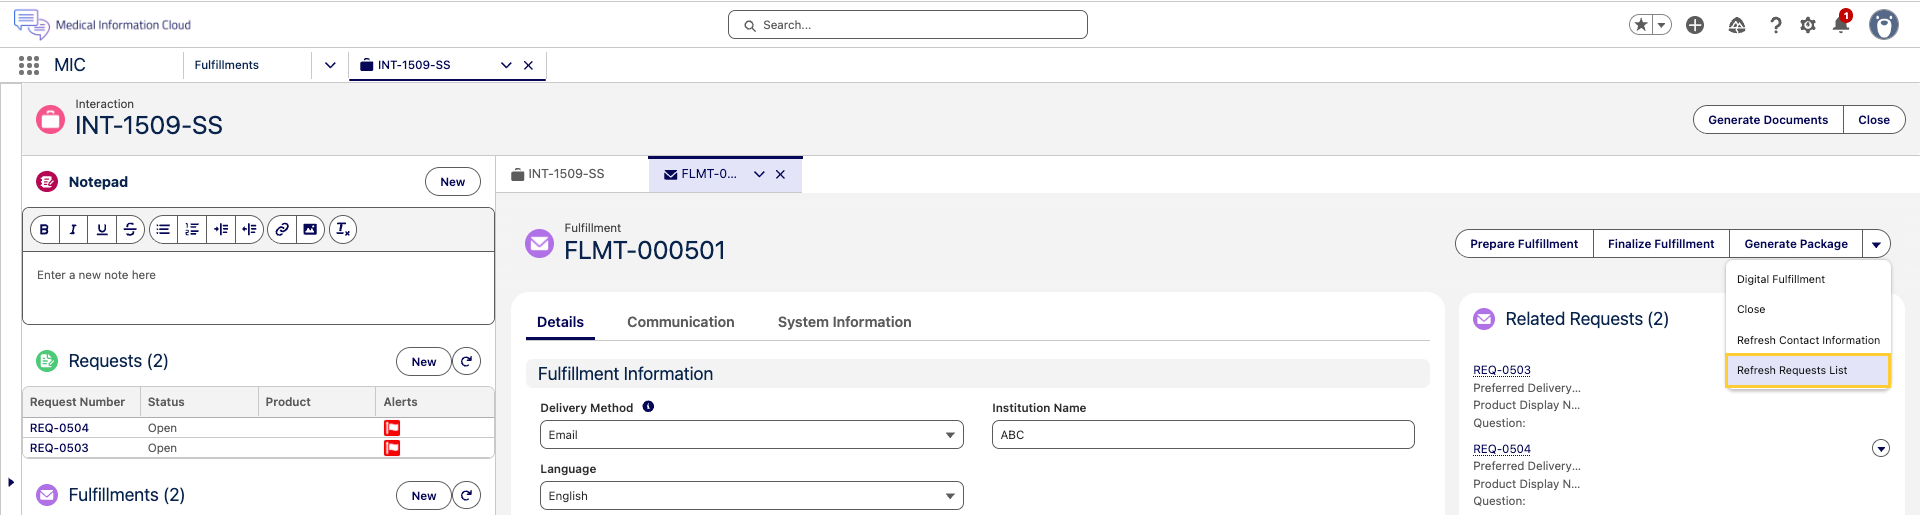
Open a Fulfillment record and click Refresh Requests List.
-
The Questions (
MED_Questions__c) and Attachments (MED_Attachments__c) rich text fields are populated from the Fulfillment's Request Fulfillments and linked files. Optionally, edit either field if you need to override the default summary.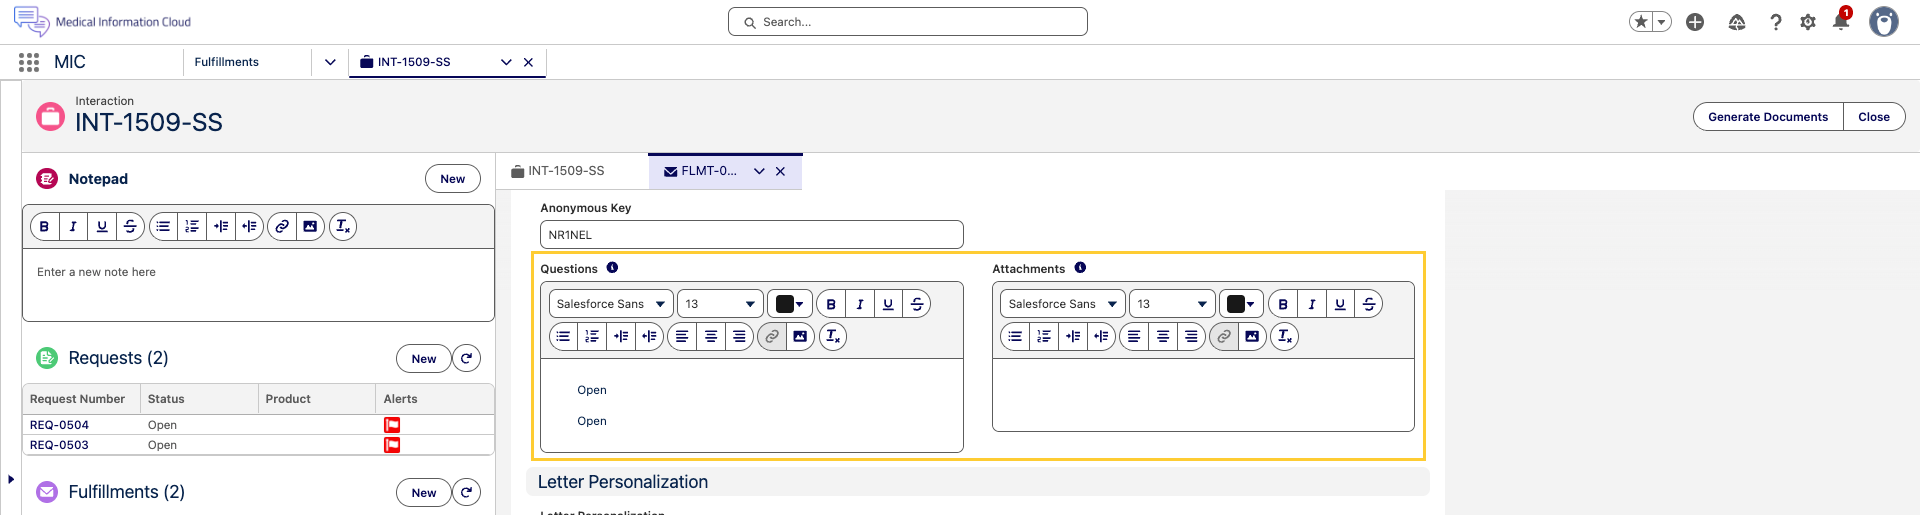
-
To send the fulfillment as an email, click Digital Fulfillment.
-
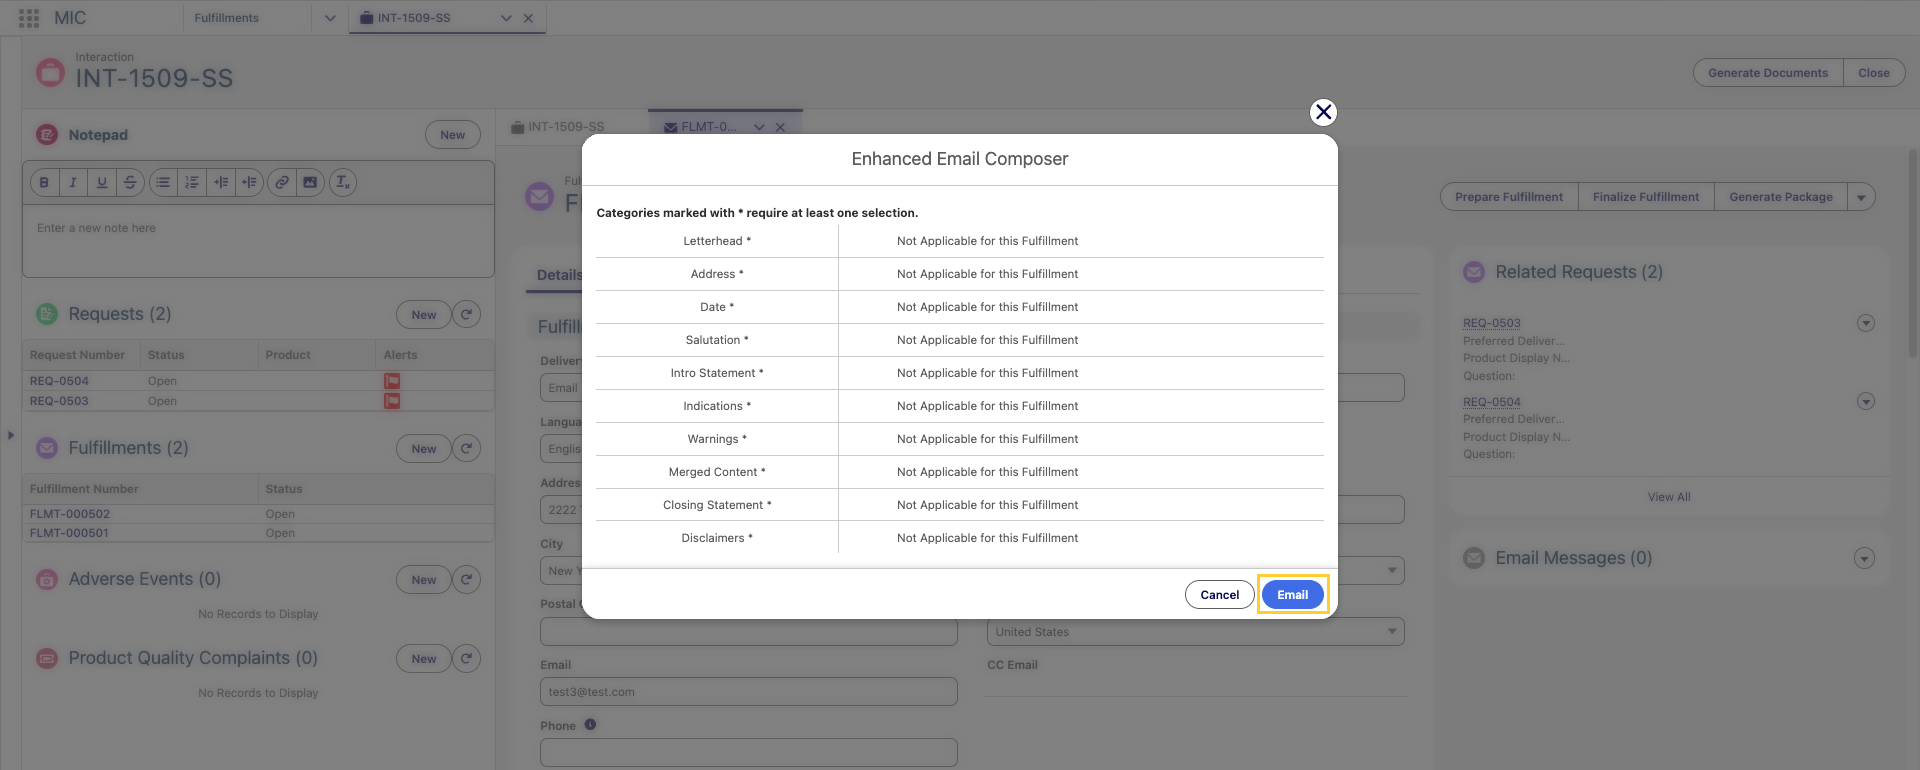
The Enhanced Email Composer modal opens with the email body preview. Click Email when ready.
-
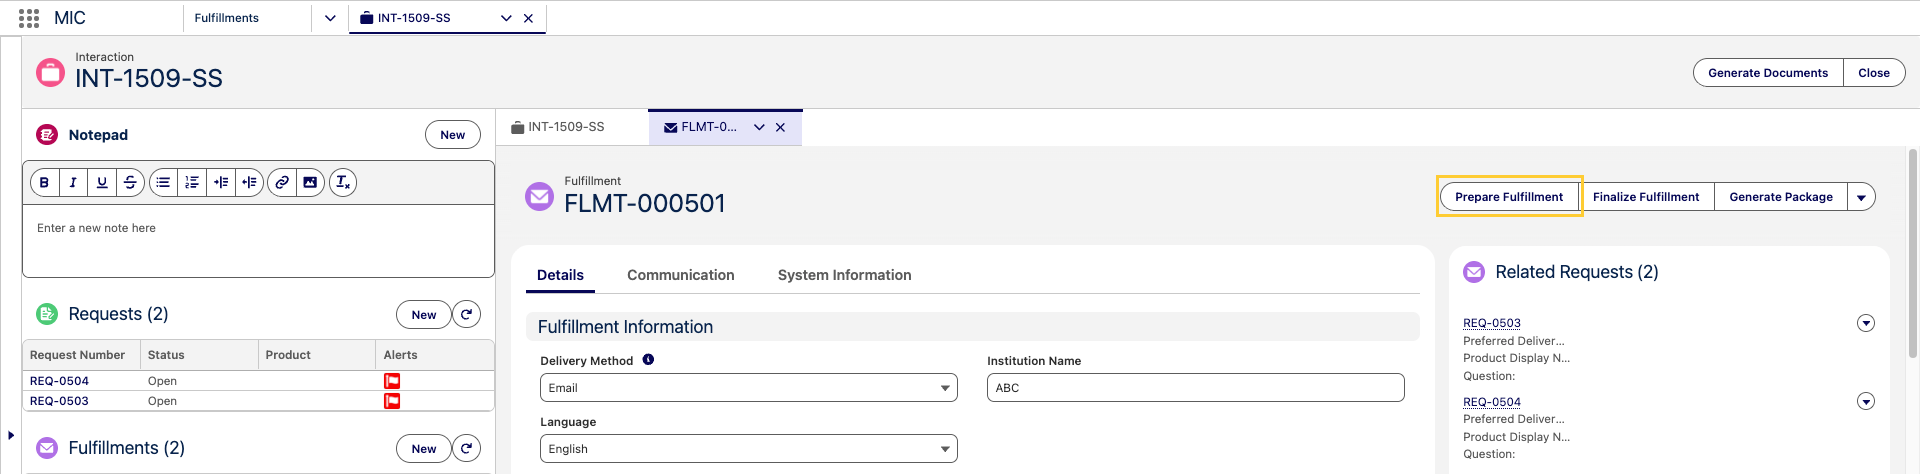
To deliver the fulfillment as a single merged PDF, click Prepare Fulfillment.
-
Review and reorder the files, choose Delivery Method for each section, and click Merge.
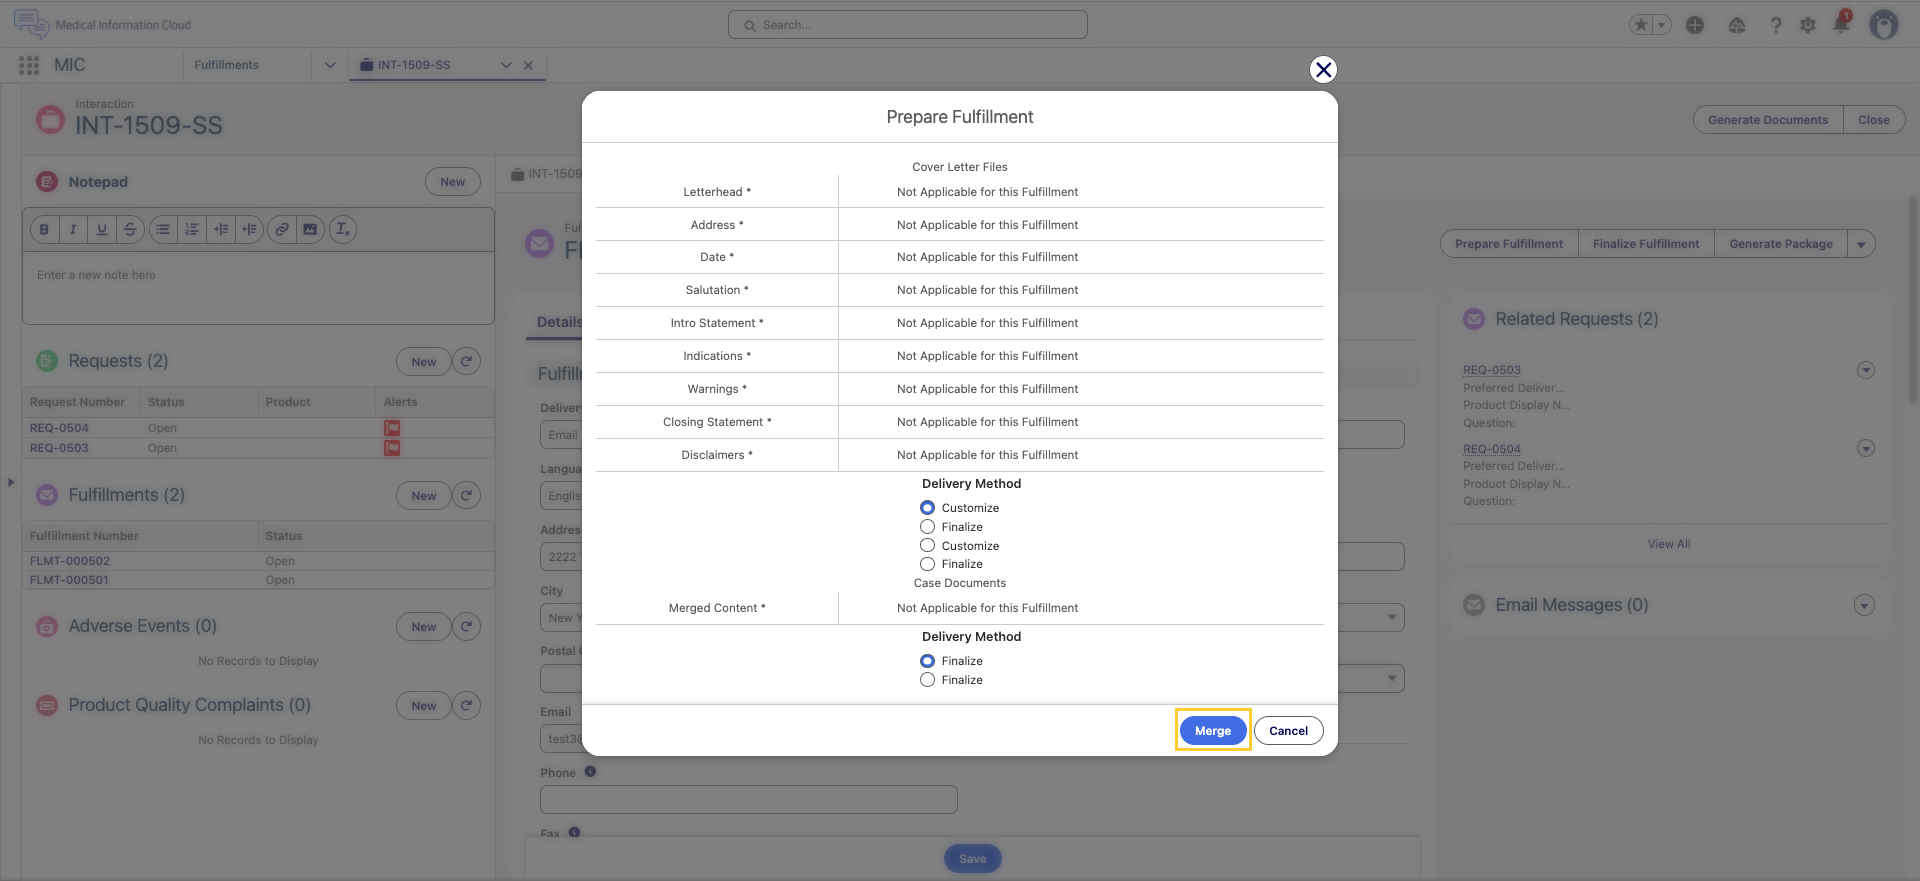
-
Wait for the two Running Jobs to complete in the package queue.
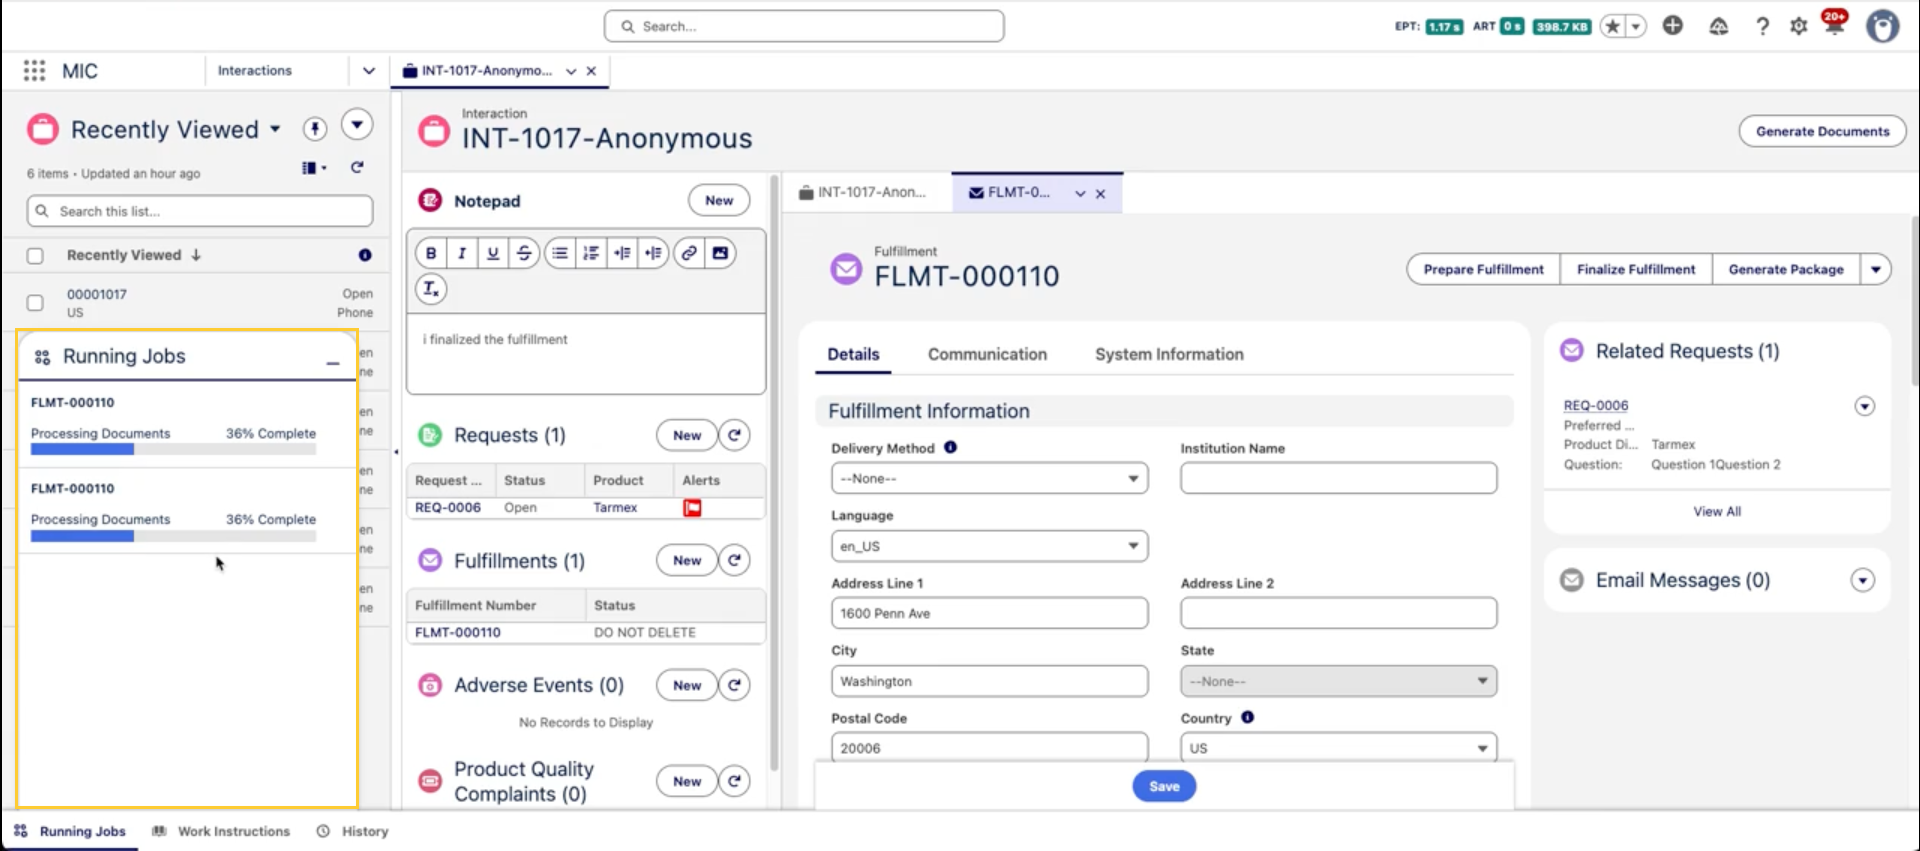
-
Click Finalize Fulfillment.
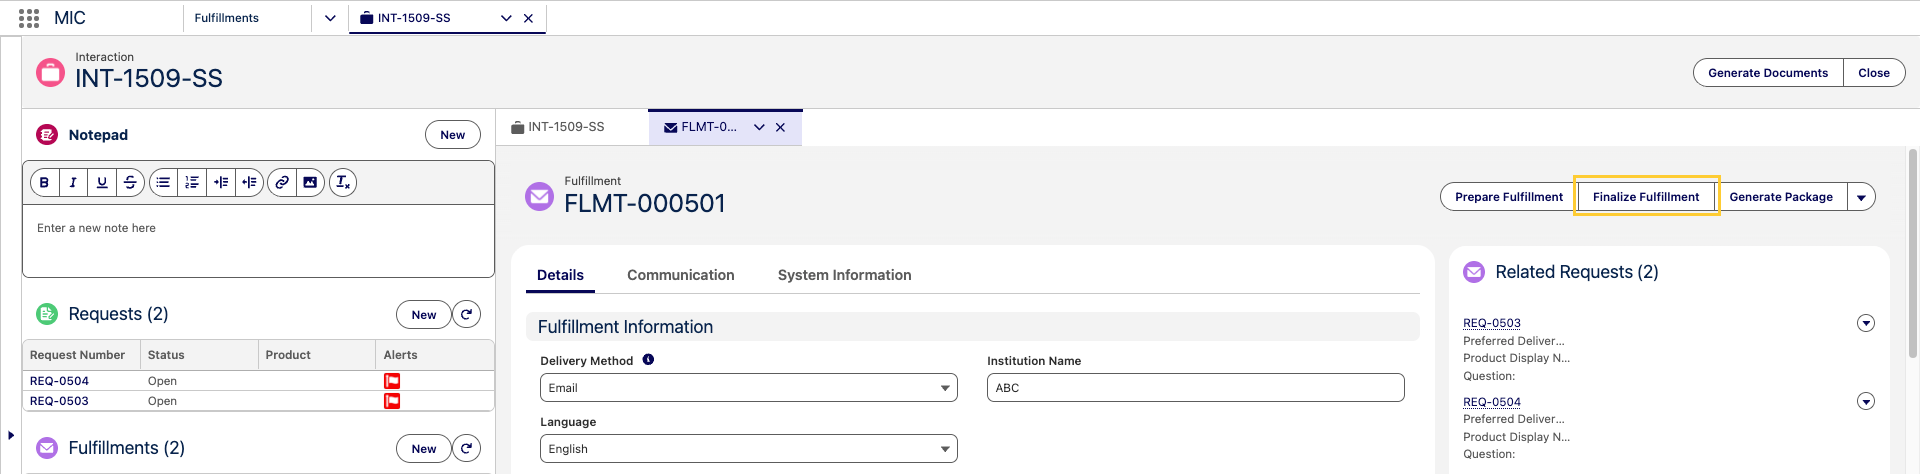
-
Confirm the order of files in the final package and click Merge.
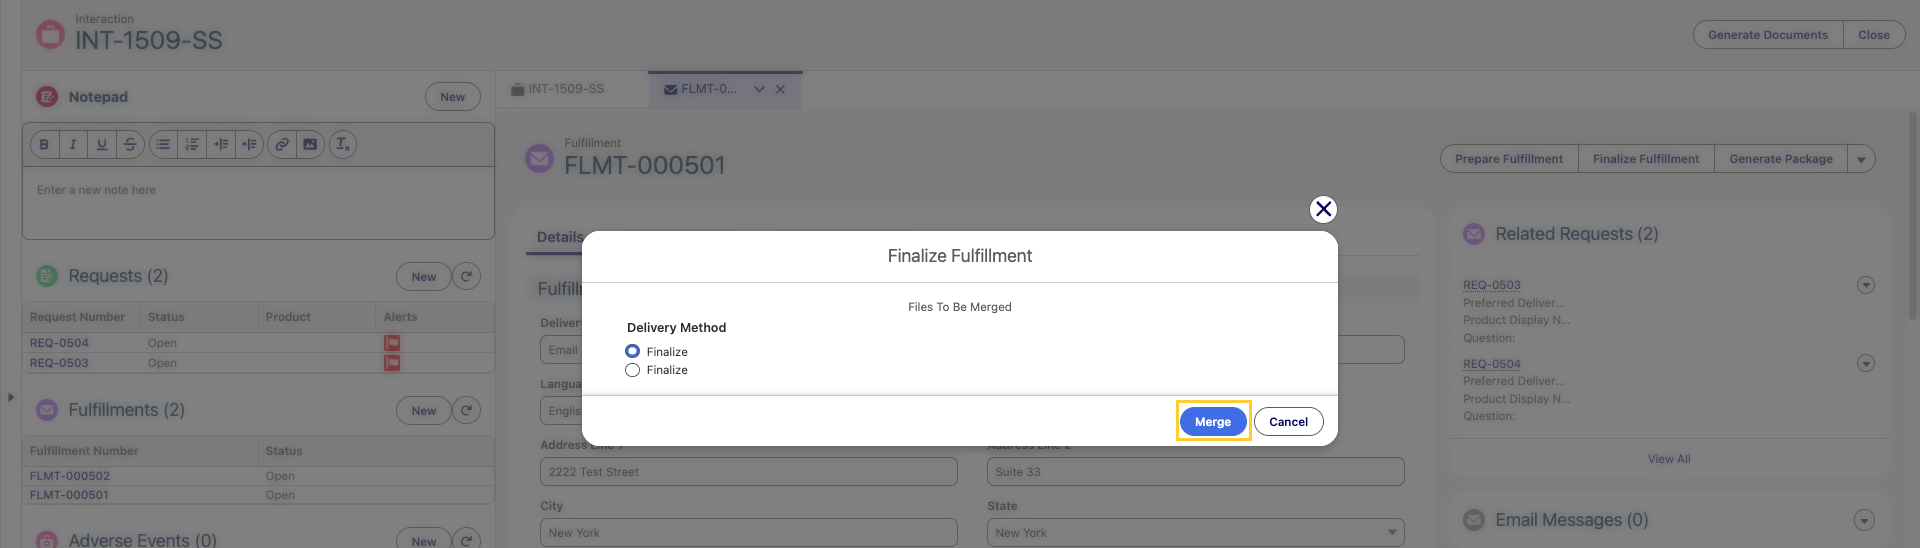
-
The final fulfillment PDF is produced and the intermediate files generated by Prepare Fulfillment are deleted.
Running Finalize Fulfillment before the two Prepare Fulfillment jobs have completed produces an incomplete final PDF. Wait for the package queue to report that the Prepare jobs are done before clicking Finalize Fulfillment.
If a user clicks the Digital Fulfillment button on the Fulfillment record page, an Enhanced Email Composer modal will open where the user can modify and confirm the content to be included in the email. Each piece of information is pulled from the Content (rich text) (mvn__CM_Content_Rich_Text__c) field on a Document Version record, and if a section contains multiple pieces of information, users can drag and drop the content to reorder how they appear in the email body.
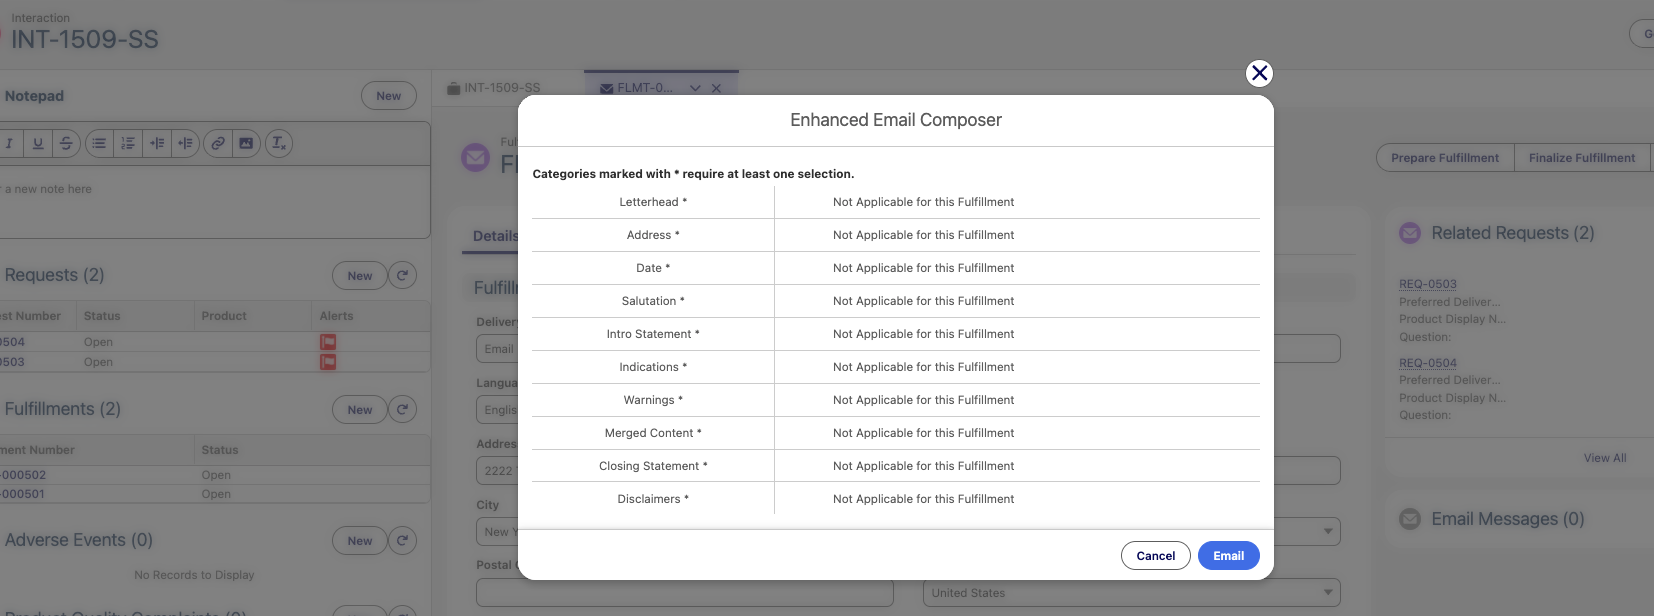
When the user clicks Email at the bottom of the Enhanced Email Composer modal, an Email Fulfillment component will open in a new subtab. The email body will be populated according to the information from the Enhanced Email Composer modal and the email attachments will include the generated fulfillment package. Users without the Customize Response on Fulfillment permission set can change the To and From values but cannot modify the Subject field, the Body message, or the attachments.
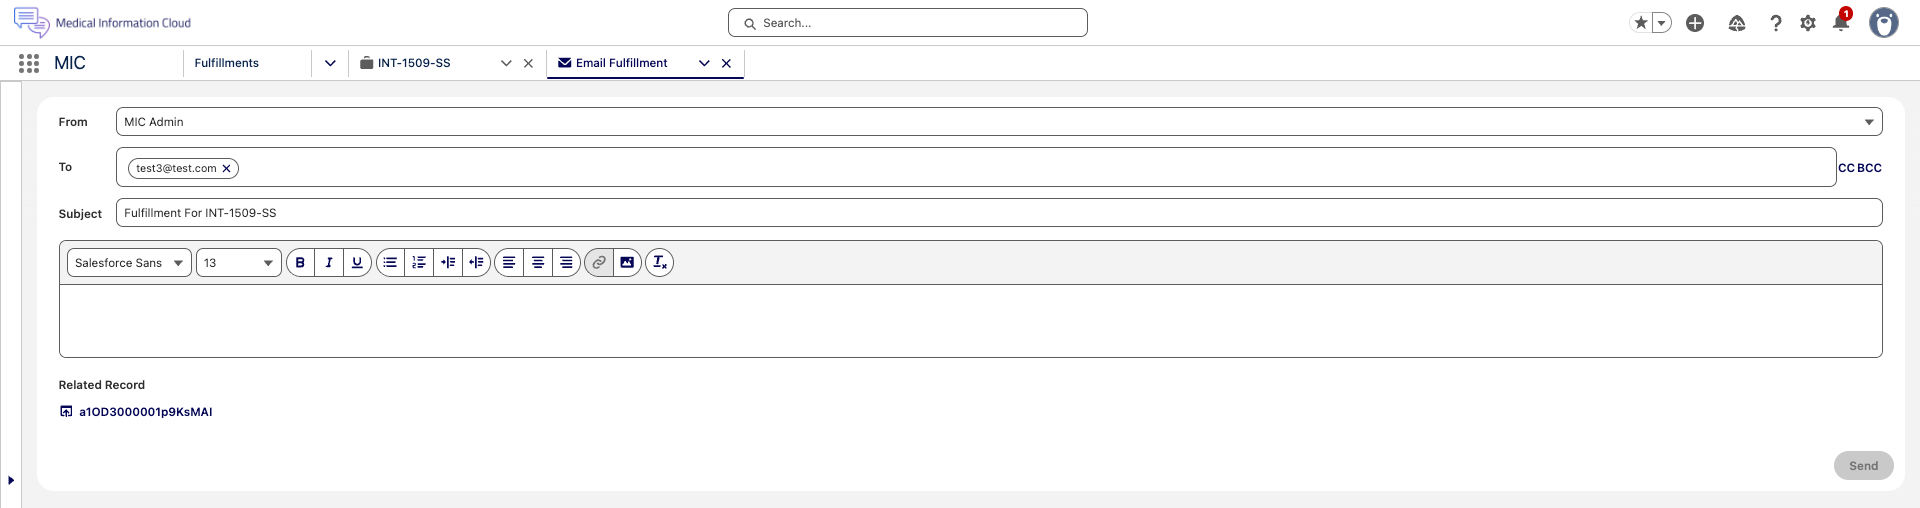
For more information about the fields in the Digital Component email, reference the Digital Fulfillment email component fields table below.
The Configure Fulfillment Package modal for the fulfillment package generation process and the Enhanced Email Composer for the Digital Fulfillment feature are separate and different. The former is used to generate the cover letter components and merge related documents into the fulfillment package while the latter is used to generate the body message and attach files to the email. However, the format and content of the cover letter and the email body are both controlled by the Dynamic Fulfillment Setting custom metadata type and may be identical. As a result, for information on how to configure the Enhanced Email Composer modal for Digital Fulfillment, reference the Configure cover letter component behavior section above.
Digital Fulfillment email component fields
| Field | Default value | Additional notes |
|---|---|---|
| From | Defaults to the Fulfillment Outbound Email (MED_Fulfillment_Outbound_Email__c) value on the selected country or segment's Local Setting (MED_Local_Setting__mdt) custom metadata record. The email on the Fulfillment Outbound Email field must be an organization-wide email address. | The From field will default to the Fulfillment Outbound Email value but will include all available organization-wide email addresses as well as the current user's email address for the user to select from. |
| To | Defaults to the Email (MED_Email__c) value on the Fulfillment record. | |
| CC | Defaults to the CC Email (MED_CC_Email__c) value on the Fulfillment record. | |
| BCC | N/A | |
| Subject | Defaults to the Fulfillment Email Subject Label (MED_Fulfillment_Email_Subject_Label__c) value on the selected country or segment's Local Setting (MED_Local_Setting__mdt) custom metadata record. The value on the Fulfillment Email Subject Label field must be a reference to a custom label. For new installs of Medical Information Cloud on Fall '25 (or above), the Default (Default) Local Setting metadata record uses the MED_Fulfillment_Email_Subject custom label. | The custom label can include merge fields. |
| Body | Includes the Content (rich text) (mvn__CM_Content_Rich_Text__c) value on the Document Version (mvn__CM_Document_Version__c) record of every document to be included in the fulfillment package. In other words, this is the merged result of the content inside the Enhanced Email Composer modal after clicking the Digital Fulfillment action. Merge fields in the cover letter component's rich text are automatically replaced with the corresponding Fulfillment record values. | The Body field can have a maximum of 384,000 characters, according to Salesforce's Email Body Character Limits. Users can add images to the Body field but should only embed publicly available images that are either hosted in a Salesforce org and shared with a link or hosted on an external website to the Body field. Note: Users should not use the image option in the rich text toolbar to attach local images. To best ensure that images are properly included in the fulfillment emails, users should either insert the URL of the image or copy the image from the public location (e.g., right click on the image and select Copy) and then paste the image into the rich text field (e.g., right click in the field and select Paste). |
| Related Record | Shows the ID of the related Fulfillment record. | |
| Attachments | Includes all of the files on the Fulfillment record. | Users can click the X icon on an attachment to remove it from the email as well as drag and drop the attachments to reorder them. |
The Digital Fulfillment workflow has two complementary parts:
-
Cover letter authoring - The email body and any inline content pulled from related records (Questions answered, Attachments, and other configured summaries). This part is driven by the Questions (
MED_Questions__c) and Attachments (MED_Attachments__c) rich text fields on the Fulfillment (MED_Fulfillment__c) object and by the Fulfillment Child Summary (MED_Fulfillment_Child_Summary__mdt) custom metadata type, which controls how related records are summarized into those fields. -
Package assembly - The production of the final fulfillment PDF and separate attached PDFs, when applicable. This part is driven by the Prepare Fulfillment and Finalize Fulfillment quick actions on the Fulfillment record (by the
Global Cover Letter Template,Global Case Documents Template, andGlobal Final TemplateDDP records), and by the Template Case DDP Name (MED_Template_Case_DDP_Name__c) and Template Final DDP Name (MED_Template_Final_DDP_Name__c) fields on the Local Setting (MED_Local_Setting__mdt) custom metadata type.
Cover letter authoring
Questions and Attachments fields
The Fulfillment (MED_Fulfillment__c) object has two rich text fields that hold the lists shown to end users in the cover letter email body:
| Field | Purpose | How it is populated |
|---|---|---|
Questions (MED_Questions__c) | List of questions answered by the fulfillment. | Populated when the Digital Fulfillment quick action is used; refreshed by the Refresh Requests List quick action or whenever Request Fulfillment children are recreated. |
Attachments (MED_Attachments__c) | List of files that will accompany the email fulfillment. | Refreshed whenever files are attached to or removed from the Fulfillment record. |
Both fields are editable by users with the Medical Information Cloud Admin (MED_Medical_Information_Cloud_Admin) and Medical Information Cloud User (MED_Medical_Information_Cloud_User) permission sets.
End users can edit either value to override the default summary in the email body. The Medical Information Cloud automation only replaces a value when the upstream data changes. Manual values
entered on a Fulfillment whose Requests and Files have not changed are preserved.
To use these fields in a cover letter component, reference Questions (MED_Questions__c) or Attachments (MED_Attachments__c) like any other Fulfillment field. The values are stored as HTML so that the email body retains the bulleted or tabular layout produced by the framework.
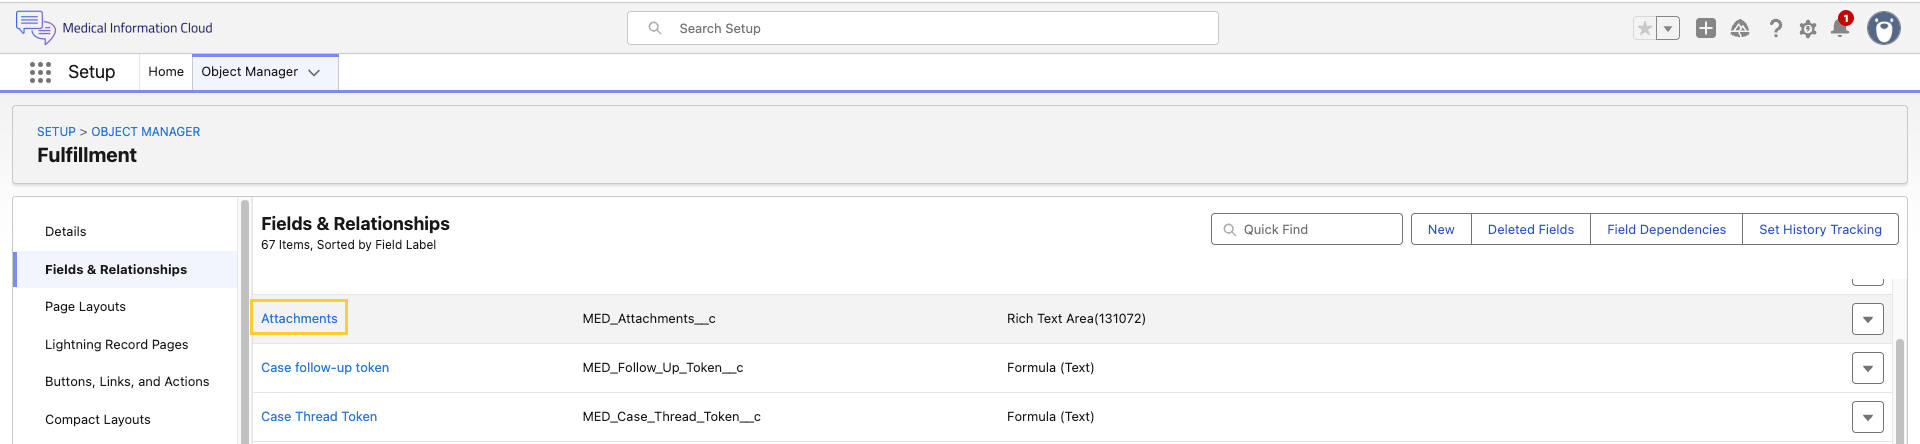
Fulfillment Child Summary
The Fulfillment Child Summary
(MED_Fulfillment_Child_Summary__mdt) custom metadata type drives which child records on a Fulfillment are summarized, how they are formatted, and where the formatted HTML lands. Each record on the custom metadata type configures one summary.
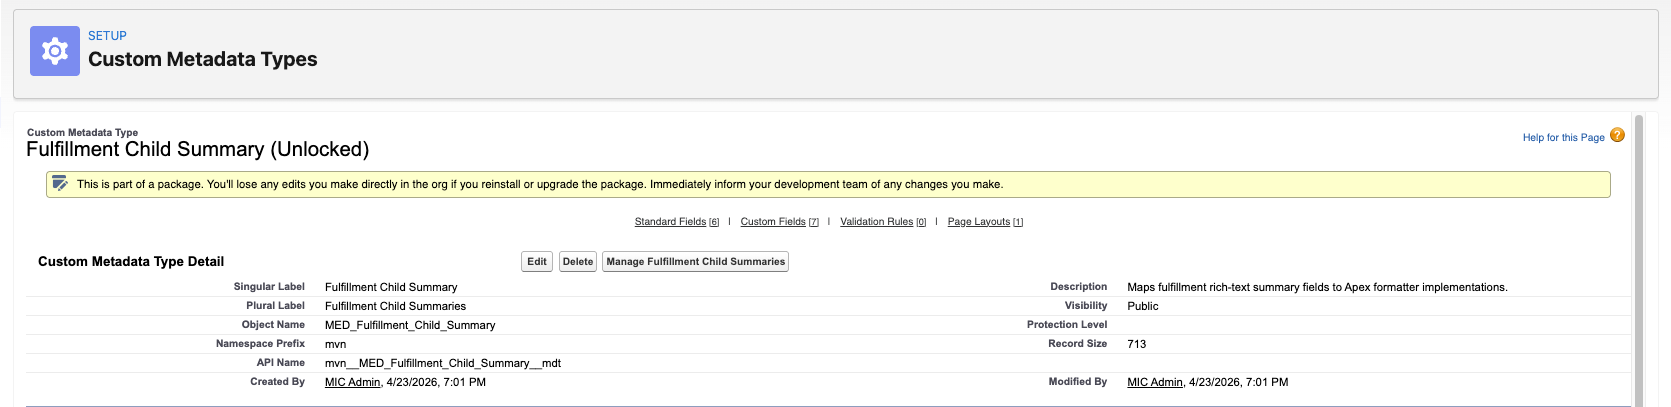
Fulfillment Child Summary fields
| Field | Description |
|---|---|
Active (MED_Active__c) | When checked, the Fulfillment Child Summary orchestrator includes this row. Clear to turn off the mapping without deleting the record. |
Child Query Where Clause (MED_Child_Query_Where_Clause__c) | Optional SOQL WHERE fragment applied to the child query. Use it to filter, for example, to only Open Request Fulfillments. |
Child Relationship Name (MED_Child_Relationship_Name__c) | The API name of the child relationship on (Fulfillment) MED_Fulfillment__c. The relationship name resolves to the child SObject that will be summarized. Required for list and table formatters. |
Field Set (MED_Field_Set__c) | The field set on the child object that defines the columns or list field. The first field in the field set is used as the list item value when the formatter renders a bulleted list. |
Formatter Class (MED_Formatter_Class__c) | The Apex class used to render the summary HTML when Handler Type is custom. The class must implement MED_IFulfillmentChildHtmlBuilder. |
Handler Type (MED_Handler_Type__c) | When set to custom, the orchestrator uses the Apex class named in Formatter Class. When set to the API name of an Apex class that implements MED_IFulfillmentChildHtmlBuilder (for example, MED_FulfillmentReqDocsListHtmlBldr), that class is used directly. |
Target Field (MED_Target_Field__c) | The API name of the rich text field on MED_Fulfillment__c that receives the rendered HTML. |
Adding a new summary
To surface another related list on the Fulfillment record:
-
In Setup → Custom Metadata Type, open Fulfillment Child Summary.

-
Click Manage Fulfillment Child Summaries.

-
Click New.

-
Configure the following:
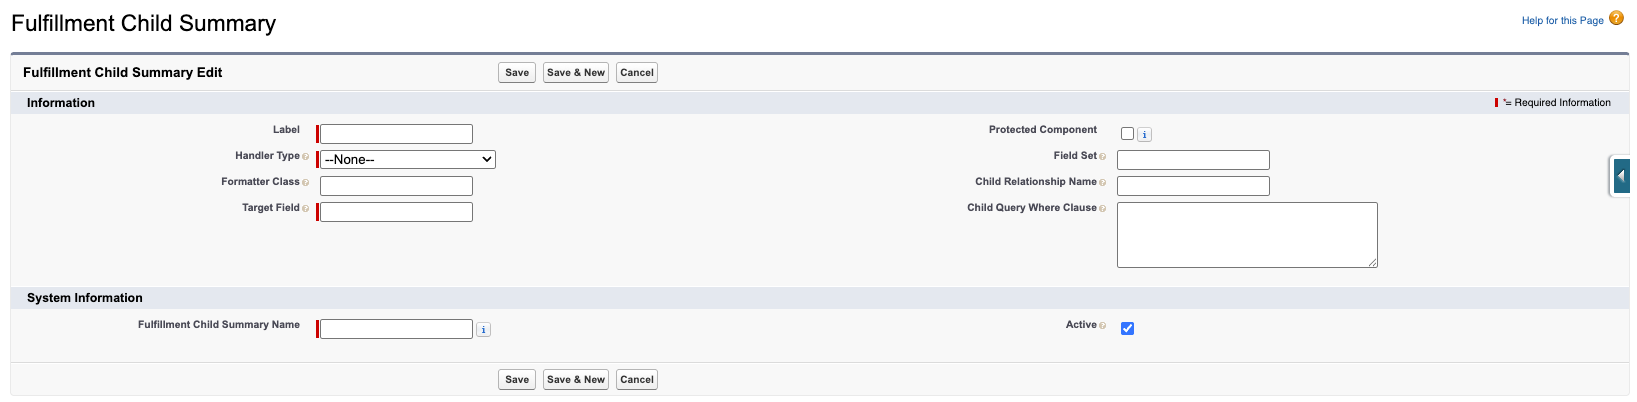
- Label and Fulfillment Child Summary Name - Enter a name.
- Handler Type - Choose a Handler Type from the following:
- Custom Formatter Class: To use, add a custom class that implements
MED_IFulfillmentChildHtmlBuilderin Formatter Class. - Fulfillment Child - List: To use this formatter that uses the
Child_Relationship_Name__clookup, set Formatter Class toMED_FulfillmentChildListHtmlBuilder. - Fulfillment Child - Table: To use this formatter that uses the
Child_Relationship_Name__clookup, set Formatter Class toMED_FulfillmentChildTableHtmlBuilder. - Request Documents - List: To use this formatter, enter the
Apex class API name directly in Handler Type
(
MED_FulfillmentReqDocsListHtmlBldrorMED_FulfillmentFilesListHtmlBuilder) and leave Formatter Class empty.
- Custom Formatter Class: To use, add a custom class that implements
- Target Field - API name of the rich text (HTML) field on
MED_Fulfillment__cthat will receive the rendered HTML (generated summary). - Field Set - Enter the Field Set API name. Create the field set on the child object first if it does not exist yet.
- Child Relationship Name - For a list or table of records that hang directly off Fulfillment, enter the Child Relationship Name (for example,
MED_Request_Fulfillments__r). - Child Query Where Clause - Optionally, enter a Child Query Where Clause to filter the summarized records.
- Active - Set to (✓) to enable it.
- Save.
The new summary is picked up on the next Fulfillment trigger that runs the orchestrator (record creation or Refresh Requests List).
Inserting a new summary that targets a field that does not exist on Fulfillment (MED_Fulfillment__c) produces no output. Create the rich text field
first, grant Read and Edit access to the relevant permission sets, and
then point the summary at it.
Refresh behavior
The Medical Information Cloud trigger pipeline runs the orchestrator in two situations:
-
When new Request Fulfillment (
MED_Request_Fulfillment__c) records are created for a Fulfillment, including when Refresh Requests List is clicked.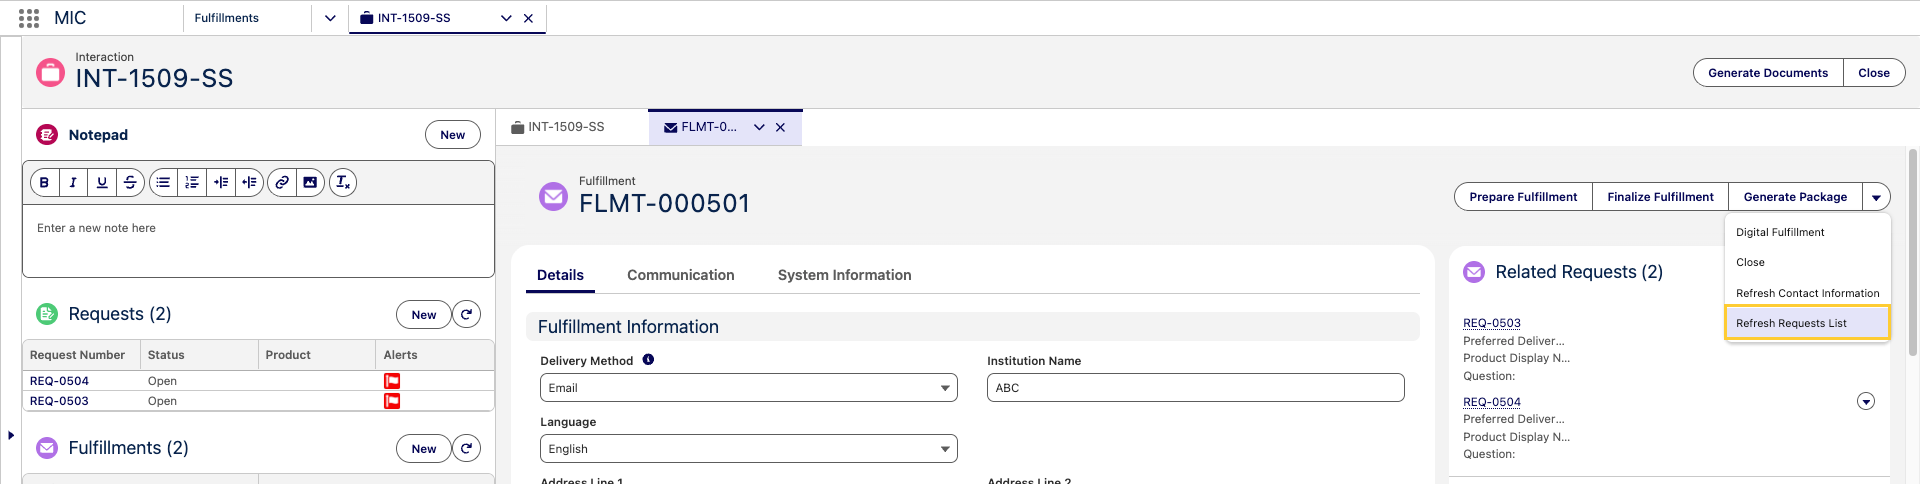
-
When files are attached to or removed from a Fulfillment record, via the Fulfillment Content Doc Link and Fulfillment Content Document trigger actions on Content Document Link (
ContentDocumentLink) and Content Document (ContentDocument) Trigger sObject Settings.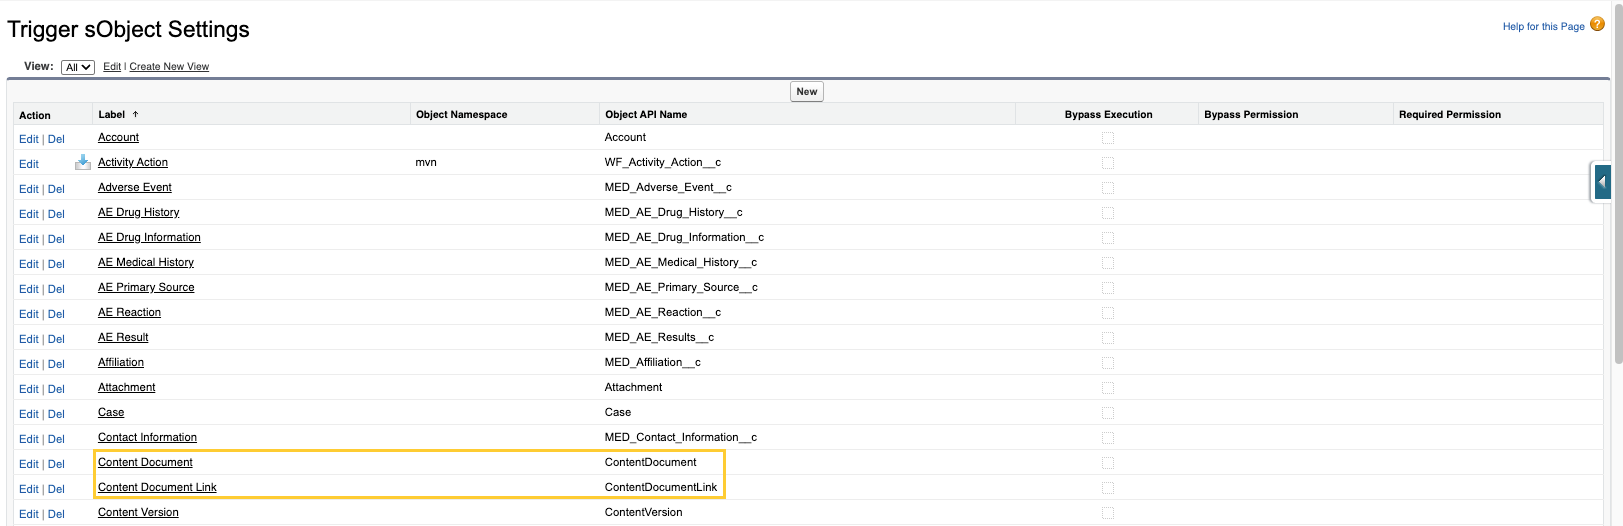
For each active Fulfillment Child Summary (MED_Fulfillment_Child_Summary__mdt) record, the
orchestrator queries the configured child records, formats the HTML, and stamps the result onto the configured target field on the Fulfillment in the same transaction.
Package assembly
"Prepare Fulfillment" and "Finalize Fulfillment" quick actions
The new fulfillment package flow uses two record-page quick actions on
the Fulfillment (MED_Fulfillment__c) object:
| Quick action | API name | Behavior |
|---|---|---|
| Prepare Fulfillment | MED_Merge_Cover_Letter | Opens the Prepare Fulfillment modal. Lists the cover letter and case document files, lets the user reorder them and pick a Delivery Method for each section, and then enqueues two package jobs: one that merges the cover letter components into a single PDF and the other that merges the case documents into a single PDF. 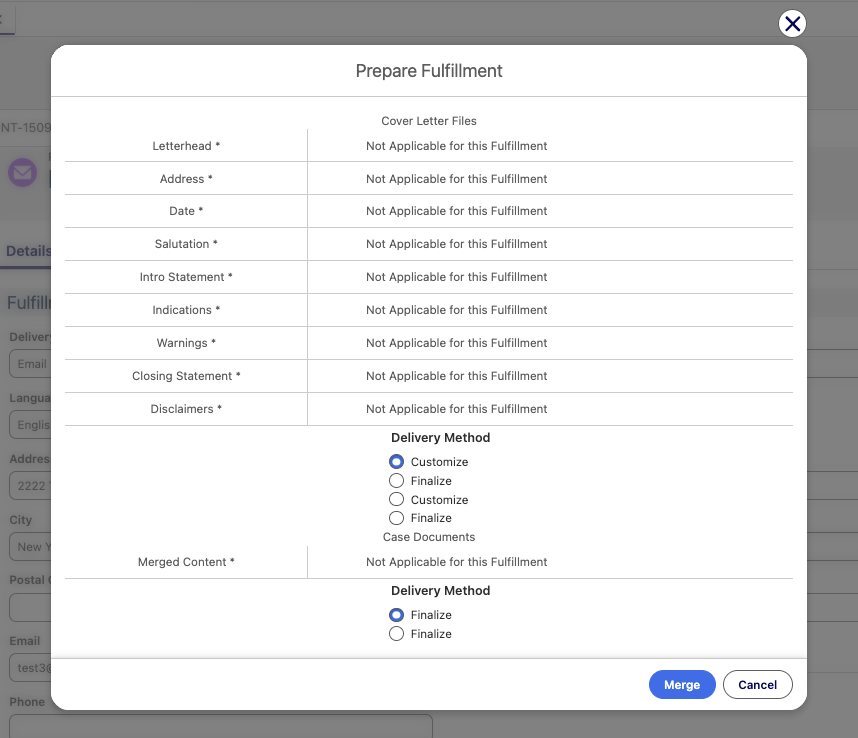 |
| Finalize Fulfillment | MED_Finalize_Merge_Letter | Opens the Finalize Fulfillment modal. Lists the PDFs produced by Prepare Fulfillment, lets the user confirm the order, and enqueues a final package job that combines them into a single fulfillment PDF. The intermediate files generated by Prepare Fulfillment are deleted after the final merge job is enqueued. 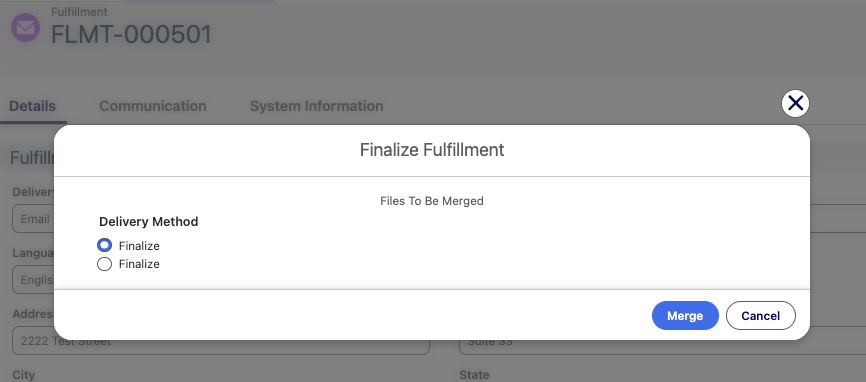 |
The split between Prepare Fulfillment and Finalize Fulfillment keeps the formatting of each source document intact. Each component is converted to PDF before being concatenated, which prevents cover letter margins, fonts, and heading styles from being applied to standard response documents during the final merge.
To use this functionality, an administrator must add the
Prepare Fulfillment (MED_Merge_Cover_Letter) and
Finalize Fulfillment (MED_Finalize_Merge_Letter) quick actions to the Fulfillment (MED_Fulfillment__c) page layout(s) in the org. The actions are not deployed to any specific page layout on upgrade.
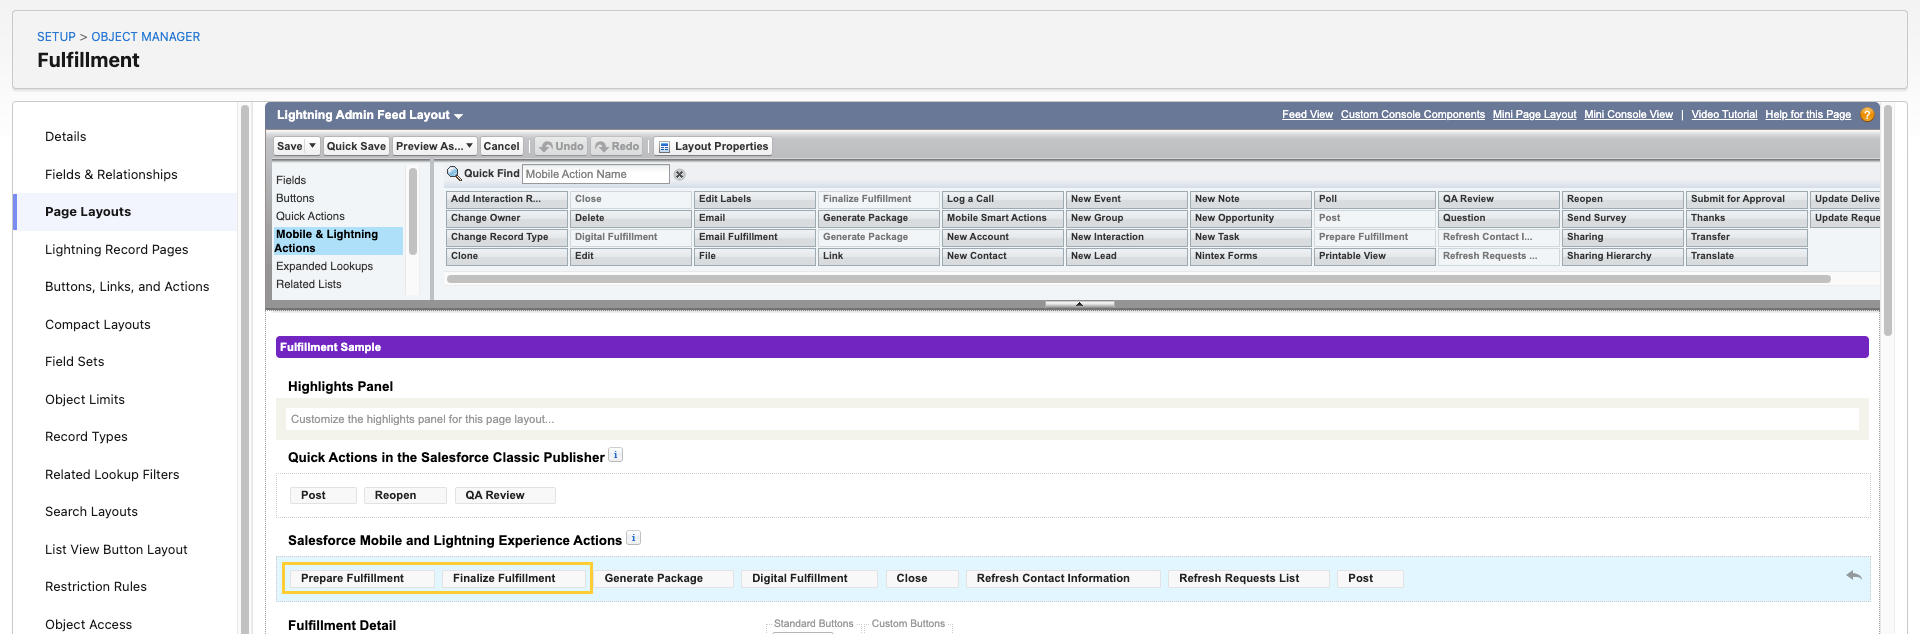
The legacy Generate Package (MED_Generate_Fulfillment_Package) and Email Fulfillment (MED_Email_Fulfillment) actions remain available on the Fulfillment record so that customers who have not yet adopted the new flow can continue to use the existing process.

DDP templates and Local Settings
The new flow uses three DDP templates that are seeded by the Medical Information Cloud - Setup plan in the Install Service:
| DDP template | Purpose |
|---|---|
Global Cover Letter Template | Cover letter components only. Used by Prepare Fulfillment to assemble the cover letter PDF. |
Global Case Documents Template | Case documents only. Used by Prepare Fulfillment to assemble the case documents PDF. |
Global Final Template | Combined output. Used by Finalize Fulfillment to assemble the final fulfillment PDF. |
Two new fields on the Local Setting (mvn__MED_Local_Setting__mdt)
custom metadata type point at the new templates per country:
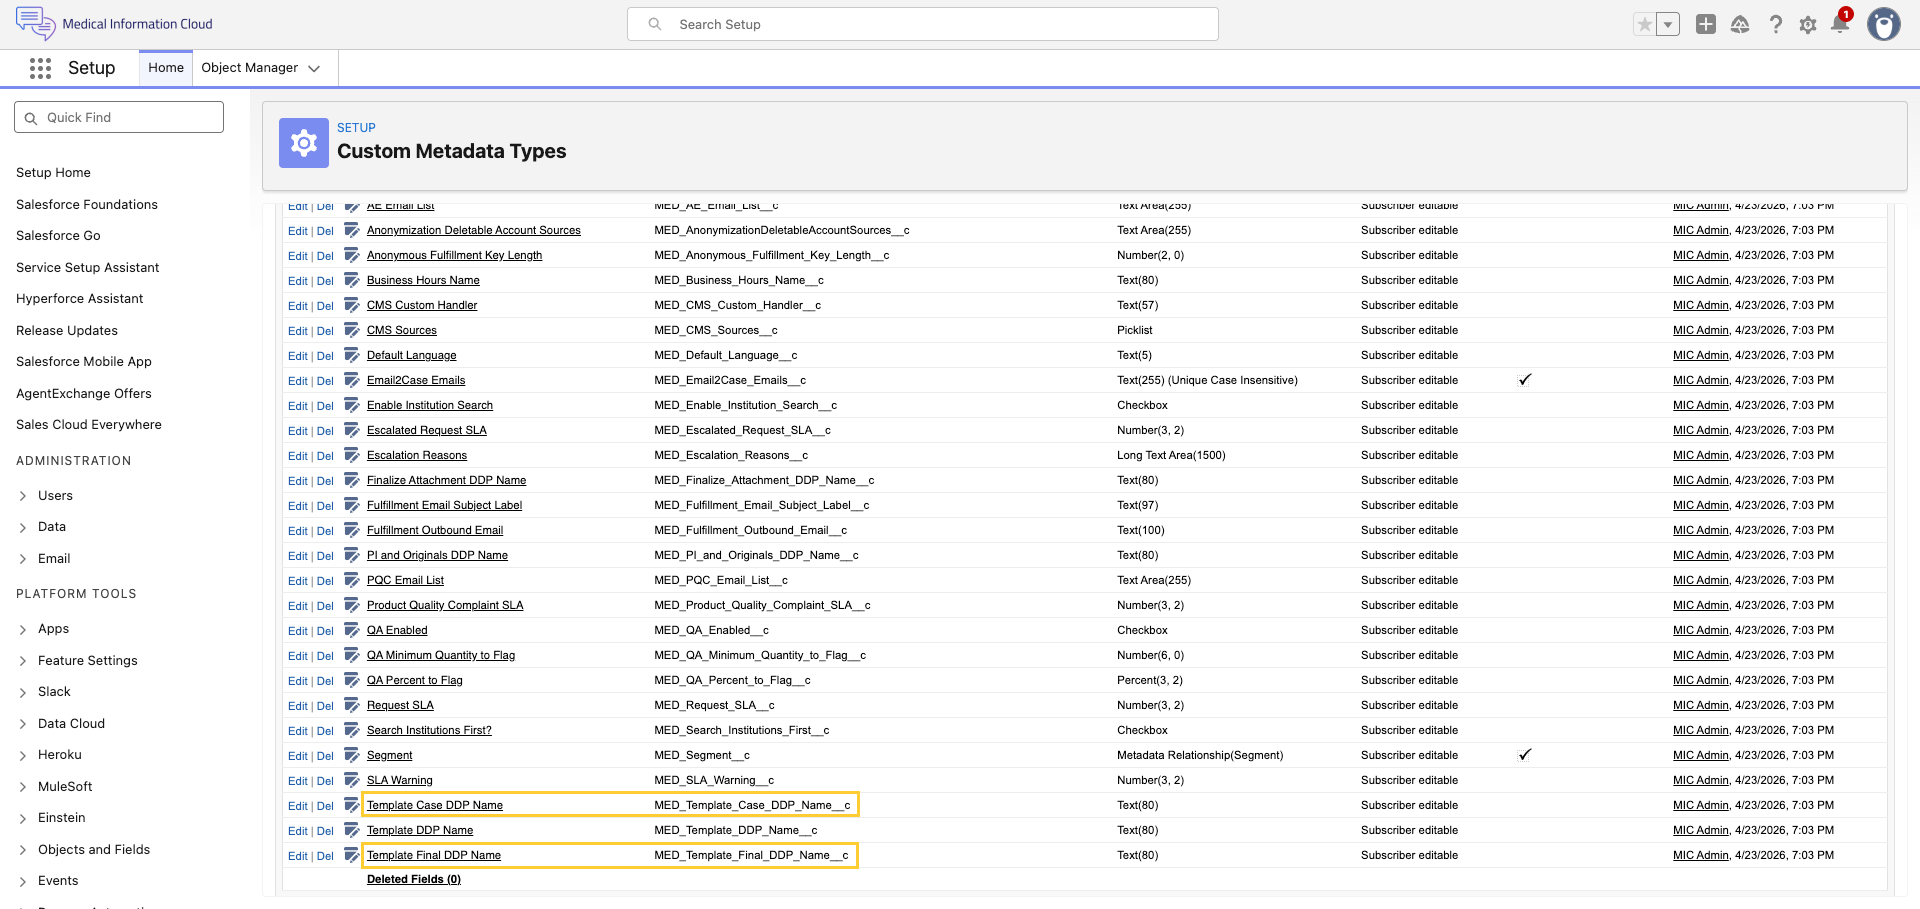
| Field | Purpose |
|---|---|
Template Case DDP Name (MED_Template_Case_DDP_Name__c) | The base name of the DDP template used to generate the case documents PDF. |
Template Final DDP Name (MED_Template_Final_DDP_Name__c) | The base name of the DDP template used to generate the final merged fulfillment package. |
The out-of-the-box Default (Default) Local Settings (MED_Local_Setting__mdt) record points these fields at the new Global Case Documents Template and Global Final Template DDP records. Customers who maintain custom Local Settings (MED_Local_Setting__mdt) records per country must update those records to point at the new templates before end users can run Prepare Fulfillment and Finalize Fulfillment in that country.
Configure follow-up opt in/opt out emails
Requesters can opt in or opt out of receiving email updates from Request Follow-Ups. To configure this feature, first create new public sites for both opting in and opting out and then update the out-of-the-box Fulfillment email templates to include these two options.
Create a public site
To create an opt-in site:
-
In the Quick Find box in Setup, search for and select Sites.
-
Click New.
-
Add a Site Label (this will be the name of the site as seen in the user interface).
-
The Site Name field automatically populates with an API name based on the value in the Label field.
-
Set the site's default web address, e.g., "subscribe".
-
Set the Active Site Home Page to
MED_RequestFollowUpSubscribe. -
Leave the remaining fields with their default values.
-
Click Save.
To create an opt-out site:
-
In the Quick Find box in Setup, search for and select Sites.
-
Click New.
-
Add a Site Label (this will be the name of the site as seen in the user interface).
-
The Site Name field automatically populates with an API name based on the value in the Label field.
-
Set the site's default web address, e.g., "unsubscribe".
-
Set the Active Site Home Page to
MED_RequestFollowUpUnsubscribe. -
Leave the remaining fields with their default values.
-
Click Save.
Updating out-of-the-box fulfillment email templates
To update the Fulfillment Template for opting in:
-
In the Quick Find box in Setup, search for and select Classic Email Templates.
-
Click Fulfillment Template.
-
Click Edit HTML Version.
-
In the Subscribe Public Site field replace with the URL of the opt-in site you created.
-
Click Save.
To update the Follow-up Fulfillment Template for opting out:
-
In the Quick Find box in Setup, search for and select Classic Email Templates.
-
Click Follow-up Fulfillment Template.
-
Click Edit HTML Version.
-
In the Unsubscribe Public Site field, replace it with the URL of the opt-out site you created.
-
Click Save.
Updating custom fulfillment email templates for opting in
To update the custom Fulfillment template for opting in:
-
In the Quick Find box in Setup, search for and select Classic Email Templates.
-
Click or create the desired template.
-
Click Edit HTML version.
-
In the Email Body field, build your embeddable link by combining the Opt In Site link with the URL formula provided and replacing the Subscribe Public Site with the URL of the opt-in site you created.
:::: ::: title Email Body Example :::
Opt In Site link: https://micsit-medinfo.cs122.force.com/subscribe
URL formula: (Subscribe Public Site)?token=
Result: https://micsit-medinfo.cs122.force.com/subscribe?token= ::::
-
Embed the result into the desired text (example: Click Here) within the Email Template.
-
Click Save.
Updating the custom follow-up fulfillment template for opting out
To update the custom follow-up fulfillment template for opting out:
-
In the Quick Find box in Setup, search for and select Classic Email Templates.
-
Click or create the desired template.
-
Click Edit HTML Version.
-
Build your embeddable link by combining the Opt Out Site link with the URL formula provided and replacing the Subscribe Public Site with the URL of the opt-out site you created.
:::: ::: title Email Body Example :::
Opt out site link: Build your embeddable link by combining the Opt Out Site link with the URL formula provided by replacing (Subscribe Public Site) with the URL of the opt-out site you created.
URL Formula: (Unsubscribe Public Site)?token=
Result: https://micsit-medinfo.cs122.force.com/unsubscribe?token= ::::
-
Embed the result into the desired text (example: Click Here) within the Email Template.
-
Click Save.
Consent field updates
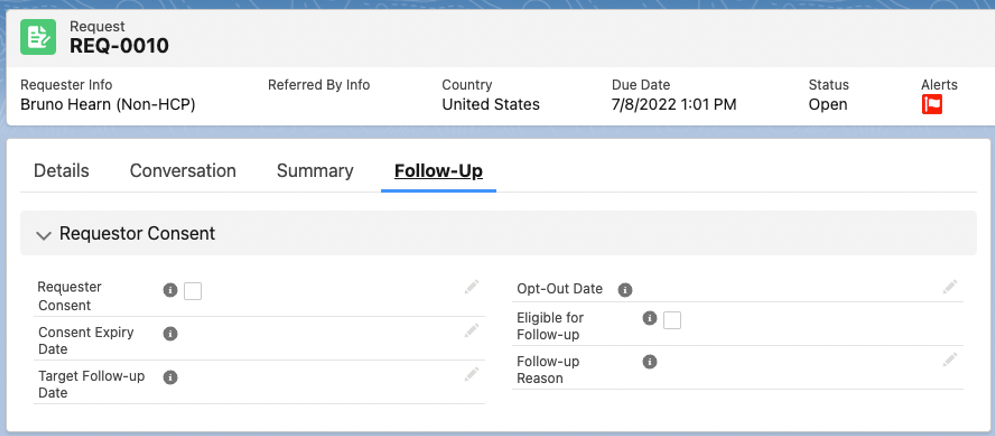
When a user clicks either the subscribe or unsubscribe link in one of the templates used above, the follow-up consent fields on the associated request automatically update in the following manner:
-
Opting In: Sets the Requester Consent checkbox to checked.
-
Opting Out: Sets the Requester Consent checkbox to unchecked and populates the opt-out date field.